Plant Monitoring and Watering System Using Evive (Arduino Powered Embedded Platform)
DESCRIPTION
Monitoring plant health is very important for their fast growth. In this busy world, people usually forget to water their plants which leads to bad growth and health of their plants.
We have implemented a plant monitoring and watering system using evive which continuously monitor the moisture, humidity and temperature of the plant. When the moisture level in the soil goes down to a certain threshold, it automatically starts watering the plant. The notification and the moisture level is shared to user using telnet through WiFi.

The components required for the project are:
- Evive
- Soil moisture sensor which you can get from here
- Humidity sensor which you can get from here
- Temperature sensor LM35 which you can get from here
- A water pump
- A thin water tube (compatible with your pump)
- ESP-12E (ESP8266) WiFi module which you can get from here
- 12-Volt battery
- Jumper cables, wires
- A water reservoir (bucket)


Before we move to mount the soil moisture sensor, we will go through the principle of soil moisture sensor. There are 4 pins in the sensor:
- Pin1: VCC (5V DC)
- Pin2: Ground (0V)
- Digital Output
- Analog Output
The sensor provides both digital and analog output which can be used for different purpose. The digital threshold can be changed using the potentiometer. So id we use digital output then we will have only two moisture levels. We can define one moisture level as pump 'TURN OFF' and the other level as pump 'Turn ON'. But we have a disadvantage here using the digital output. Whenever the motor starts, and the moisture level increases near sensor and crosses the threshold, pump will be switched off. Thus, watering will be for very short period of time and water will not reach into deep roots.
Other option is to use analog output. Sensor returns analog value between 0-1023, where 0 is for wet soil and 1023 for dry soil. Here we can set two thresholds, one for starting the watering and one for stopping.
For this project we are using analog output of soil moisture sensor.

Humidity sensor provides the information humidity level of air around the plant. It has 3 pins,
Humidity sensor detects the humidity of the air around it. It has three pins that are VCC, GND and analog pin. Just connect the VCC to 5 volt and GND to ground and analog pin to A2 or whatever you want.

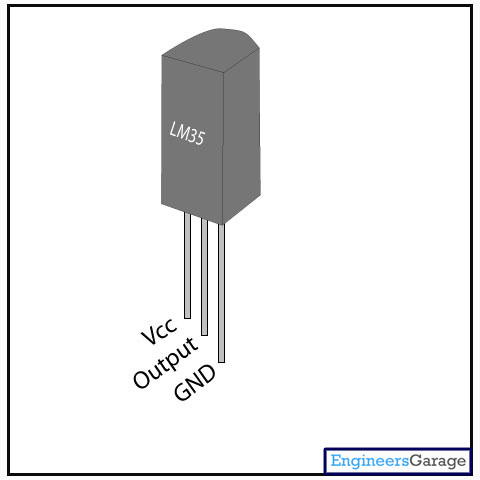
The temperature sensor will print the temperature of the room on the
evive's screen. LM35 sensor has been used for this. If you are using the temperature sensor for the first time then you may follow this code which prints the temperature around the sensor on the serial monitor in degree Celsius.
For pinouts you can see this image
http://www.engineersgarage.com/sites/default/files...
just join the VCC in 5 volt of evive and GND to ground and output to any analog pin we done it in A0.

As we know the soil moisture sensor gives high value when it is in dry soil and a lower value in the more moist soil. We have mapped the output of soil moisture from 0 to 1023 to 0 to 9. This makes discrete levels and the telnet printing part easier.
Now, attach the motor in the motor pin M1 of evive. Set the threshold value for soil moisture sensor by hit and try method for which you need to water the plant.

Now you need to print the readings of soil moisture on the telnet. you can put the ESP-12E (ESP8266) module in the given slot for it in evive. For more information about how it works you can see our Chatting with evive (STEP 3) instructable.
For printing in telnet just print the stuff in Serial3 (check out the schematic pin mapping diagram here). But the main Problem was to print them in an order.
For printing it in new line just add '\n' in the string which you are sending. if you are not sending the string then make it.
But then you will see there is one more problem that the cursor keep updating in x- direction. For this you have to print backslash b '\b' in a particular number if your no. of digits are changing then you might see problem in this, thats why we have mapped the soil moisture sensor reading in 0-9.
When the plant is watered the user will get a message "Your plant have been watered".
You can go ahead and publish it on internet by connecting ESP to some Wi-Fi router having internet access. You will have to modify the section of code where the wireless data transfer is happening.
After all components works individually, its time to merge all codes together.
Then we have to use the evive's TFT screen to display the data and update it in real-time. You can find the internal wiring diagram and pin mapping of evive for TFT and ESP at the bottom of this link.
You can find all the codes here.


Finally assemble all these stuff. Attach pipe to pump motor such that whenever pump starts water flows from motor to plant where motor takes water from a reservoir containing water. We have used bucket just for demonstrating. You can place evive nearby your plant just make sure that water away from it otherwise evive may get short circuited.
For more projects visit here.
For evive product video click here.