Arduino RFID Garage Door Opener © CC0
DESCRIPTION
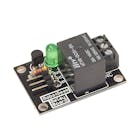
In this project, we will be using the power of RFID to tap into your garage door opening system. We are going to bridge a connection in the opener switch via a RobotGeek Relay board, initiating the door opening as if you had pressed the button. This code will work for any digital output device (such as Relays, LEDs, buzzers and more.) Activating a solenoid or motor upon a read of the 'key' tag is the basic principal behind RFID enabled locks.
Step 1: Wiring
Your Garage Door Opener Switch should be a simple wall-mounted button with two wires connected to it running from the garage door opener main unit. To attach the relay to this switch, you need to find the two screw terminals that those wires are connected to (usually on the back of the switch) to connect the center and Normally Open pins from the Relay board. Leave the wires that are already there in place, as they are necessary. The Garage Door Opener Switch basically shorts these wires to signal the opener to run (if you were to touch the two wires that were already screwed into these terminals together, your garage door opener would activate). The system we are making taps into that, and shorts this connection with our relay upon an RFID card swipe.
Step 2: Get your RFID Tag ID
- Connect your RFIDuino to your PC's USB
- Open
RFIDuino_helloworldonto your board. You can find this sketch underFile>Examples>RFIDuino>RFIDuino_helloworld
- You will need to make sure the code is adjusted for your RFIduino hardware. v1.2 shields (2 pin antenna, 'REV 1.2' printed on the board) will need the following code
RFIDuino myRFIDuino(1.2); //initialize an RFIDuino object for hardware version 1.2v1.1 shields (4-pin antenna, no version number printed on the board) will need the following codeRFIDuino myRFIDuino(1.1); //initialize an RFIDuino object for hardware version 1.1Both lines of code are available in theRFIDuino_helloworldsketch, simply uncomment the one you don't need. If you are still unsure about what hardware you are using, see this page
- Connect a micro USB cable from your computer to your Geekduino
- Load RFIDuino_helloworld3 onto your board using the upload button in the Arduino IDE.
- Once loaded, you can leave your board connected to your computer - you will need this connection to power the board and to communicate with the computer
- Open the Serial Monitor.
Tools -> Serial MonitorThe serial monitor should be set to its default settings ('No Line ending', 9600 baud)
- Swipe a tag across the RFIDuino antenna. The green light will light up and your buzzer will make a noise.
- The Serial Monitor will display 5 numbers. These numbers make up the ID of your tag.
- Copy down these numbers for future use. It can be handy to write the ID on a sticky note and attach it to the tag. NOTE: You will need the ID for at least one tag for the next step
Step 3: Programming
You can use the same code here as we used in the RFID Door Lock if you have multiple tags you would like to use as keys. If you only need to use one tag, continue with this guide.
- Open
RFIDuino_demo2_lockboxonto your board. You can find this sketch underFile>Examples>RFIDuino>RFIDuino_demo2_lockbox
- You will need to make sure the code is adjusted for your RFIduino hardware. The RobotGeek RFID Garage Door Opener Kit comes with the RFIDuino V1.2. v1.2 shields (2 pin antenna, 'REV 1.2' printed on the board) will need the following code
RFIDuino myRFIDuino(1.2); //initialize an RFIDuino object for hardware version 1.2v1.1 shields (4-pin antenna, no version number printed on the board) will need the following codeRFIDuino myRFIDuino(1.1); //initialize an RFIDuino object for hardware version 1.1Both lines of code are available in theRFIDuino_demo2_lockboxsketch, simply uncomment the one you don't need. If you are still unsure about what hardware you are using, see this page
- You will also need to modify the sketch to include the ID of a tag that we found in Hello World . Find line 57 - it looks like this.
byte key_tag[5] ={0,0,0,0,0};Now insert the ID numbers for your tag. For example, if our tags ID was '70 0 44 22 242' we would modify the code to look like thisbyte key_tag[5] ={77,0,44,22,242};It is highly recommended that you use one of the larger RFID tags, such as the thin RFID card or Clamshell RFID card, as they read at greater ranges than the smaller tags in the EM4102 Tag Kit.
- Connect a micro USB cable from your computer to your Geekduino
- Load
RFIDuino_demo2_lockboxonto your board using the upload button int the Arduino IDE.
- Once loaded, you disconnect the USB cable from your computer..
- Swipe the 'key' tag across the RFIDuino antenna. The green light will light up and your buzzer play three different notes. Additionally, the relay will fire. If your system is wired correctly, this should open the garage door
- Swipe any tag that is not the 'key' tag across the RFIDuino antenna. The red light will light up and your buzzer play three monotone notes. The relay will not react.
- If everything is working correctly, you should now mount the RFIDuino antenna. Note that the antenna has limited range, so if you're going to mount it inside, it should be against the thinnest wall possible. If you have thick walls, you might want to run the antenna wire outside and mount the antenna in a weatherproof project box (such as the PacTec WP2R enclosure we used on an older RFID based kit, but have not had the pleasure of testing with this one) on the outer wall of the garage. This option is just as secure as mounting the antenna inside, as there is no way to trigger the relay through the RFIDuino antenna wires without exposing the antenna to the proper tag.
Step 4: Code Overview
This code is a modified version of RFIDuino_demo1, and as the name of the code suggests, it is used for the lockbox project. We are using the same code because it actually works exactly the same way! The code activates a new digital pin (9) so that it can control the relay board. By sending a HIGH signal to the relay board, the code activates the 'Normally Open(NO)' pin, connecting it to the common pin. When this connection is made, power can flow through the wires attached to the opener switch, activating the opener. This pin is held HIGH for a short period of time to activate the system, then the pin goes LOW to return to the system's neutral state.
If the relay activates properly, but the garage door behaves erratically (starts to open and stops suddenly, gets stuck in a loop of opening and closing, or reverses direction) there is likely an issue with a special feature of your garage door opener that is activated by the amount of time your opener button is held down. This is actually dealt with very simply by setting the time that the relay will be active for in the code. You should see a line that looks like this:
#define OPEN_TIME 1000 //the time (in milliseconds) that the solenoid will be activated for The "1000" is used later in the code in a delay function. This acts as though the opener button has been pressed for an entire second. If you are getting strange behavior from your door, it is likely that this needs to be active for a shorter amount of time. This is a process of trial and error, as every garage door opener is different based on manufacturer and model.
Step 5: Open your Garage Door!
You're ready to swipe! Can you think of a way to improve this system? Maybe you could add a keypad in case you forgot your RFID card? Maybe you want to add some lights and make it flashy when you swipe the tag? There's so much you can do! Do your thing, and let us know what you come up with!
In this project, we will be using the power of RFID to tap into your garage door opening system. We are going to bridge a connection in the opener switch via a RobotGeek Relay board, initiating the door opening as if you had pressed the button. This code will work for any digital output device (such as Relays, LEDs, buzzers and more.) Activating a solenoid or motor upon a read of the 'key' tag is the basic principal behind RFID enabled locks.
Step 1: Wiring
Your Garage Door Opener Switch should be a simple wall-mounted button with two wires connected to it running from the garage door opener main unit. To attach the relay to this switch, you need to find the two screw terminals that those wires are connected to (usually on the back of the switch) to connect the center and Normally Open pins from the Relay board. Leave the wires that are already there in place, as they are necessary. The Garage Door Opener Switch basically shorts these wires to signal the opener to run (if you were to touch the two wires that were already screwed into these terminals together, your garage door opener would activate). The system we are making taps into that, and shorts this connection with our relay upon an RFID card swipe.
Step 2: Get your RFID Tag ID
- Connect your RFIDuino to your PC's USB
- Open
RFIDuino_helloworldonto your board. You can find this sketch underFile>Examples>RFIDuino>RFIDuino_helloworld
- You will need to make sure the code is adjusted for your RFIduino hardware. v1.2 shields (2 pin antenna, 'REV 1.2' printed on the board) will need the following code
RFIDuino myRFIDuino(1.2); //initialize an RFIDuino object for hardware version 1.2v1.1 shields (4-pin antenna, no version number printed on the board) will need the following codeRFIDuino myRFIDuino(1.1); //initialize an RFIDuino object for hardware version 1.1Both lines of code are available in theRFIDuino_helloworldsketch, simply uncomment the one you don't need. If you are still unsure about what hardware you are using, see this page
- Connect a micro USB cable from your computer to your Geekduino
- Load RFIDuino_helloworld3 onto your board using the upload button in the Arduino IDE.
- Once loaded, you can leave your board connected to your computer - you will need this connection to power the board and to communicate with the computer
- Open the Serial Monitor.
Tools -> Serial MonitorThe serial monitor should be set to its default settings ('No Line ending', 9600 baud)
- Swipe a tag across the RFIDuino antenna. The green light will light up and your buzzer will make a noise.
- The Serial Monitor will display 5 numbers. These numbers make up the ID of your tag.
- Copy down these numbers for future use. It can be handy to write the ID on a sticky note and attach it to the tag. NOTE: You will need the ID for at least one tag for the next step
Step 3: Programming
You can use the same code here as we used in the RFID Door Lock if you have multiple tags you would like to use as keys. If you only need to use one tag, continue with this guide.
- Open
RFIDuino_demo2_lockboxonto your board. You can find this sketch underFile>Examples>RFIDuino>RFIDuino_demo2_lockbox
- You will need to make sure the code is adjusted for your RFIduino hardware. The RobotGeek RFID Garage Door Opener Kit comes with the RFIDuino V1.2. v1.2 shields (2 pin antenna, 'REV 1.2' printed on the board) will need the following code
RFIDuino myRFIDuino(1.2); //initialize an RFIDuino object for hardware version 1.2v1.1 shields (4-pin antenna, no version number printed on the board) will need the following codeRFIDuino myRFIDuino(1.1); //initialize an RFIDuino object for hardware version 1.1Both lines of code are available in theRFIDuino_demo2_lockboxsketch, simply uncomment the one you don't need. If you are still unsure about what hardware you are using, see this page
- You will also need to modify the sketch to include the ID of a tag that we found in Hello World . Find line 57 - it looks like this.
byte key_tag[5] ={0,0,0,0,0};Now insert the ID numbers for your tag. For example, if our tags ID was '70 0 44 22 242' we would modify the code to look like thisbyte key_tag[5] ={77,0,44,22,242};It is highly recommended that you use one of the larger RFID tags, such as the thin RFID card or Clamshell RFID card, as they read at greater ranges than the smaller tags in the EM4102 Tag Kit.
- Connect a micro USB cable from your computer to your Geekduino
- Load
RFIDuino_demo2_lockboxonto your board using the upload button int the Arduino IDE.
- Once loaded, you disconnect the USB cable from your computer..
- Swipe the 'key' tag across the RFIDuino antenna. The green light will light up and your buzzer play three different notes. Additionally, the relay will fire. If your system is wired correctly, this should open the garage door
- Swipe any tag that is not the 'key' tag across the RFIDuino antenna. The red light will light up and your buzzer play three monotone notes. The relay will not react.
- If everything is working correctly, you should now mount the RFIDuino antenna. Note that the antenna has limited range, so if you're going to mount it inside, it should be against the thinnest wall possible. If you have thick walls, you might want to run the antenna wire outside and mount the antenna in a weatherproof project box (such as the PacTec WP2R enclosure we used on an older RFID based kit, but have not had the pleasure of testing with this one) on the outer wall of the garage. This option is just as secure as mounting the antenna inside, as there is no way to trigger the relay through the RFIDuino antenna wires without exposing the antenna to the proper tag.
Step 4: Code Overview
This code is a modified version of RFIDuino_demo1, and as the name of the code suggests, it is used for the lockbox project. We are using the same code because it actually works exactly the same way! The code activates a new digital pin (9) so that it can control the relay board. By sending a HIGH
signal to the relay board, the code activates the 'Normally Open(NO)' pin, connecting it to the common pin. When this connection is made, power can flow through the wires attached to the opener switch, activating the opener. This pin is held HIGH
for a short period of time to activate the system, then the pin goes LOW
to return to the system's neutral state.
If the relay activates properly, but the garage door behaves erratically (starts to open and stops suddenly, gets stuck in a loop of opening and closing, or reverses direction) there is likely an issue with a special feature of your garage door opener that is activated by the amount of time your opener button is held down. This is actually dealt with very simply by setting the time that the relay will be active for in the code. You should see a line that looks like this:
#define OPEN_TIME 1000 //the time (in milliseconds) that the solenoid will be activated for
The "1000" is used later in the code in a delay function. This acts as though the opener button has been pressed for an entire second. If you are getting strange behavior from your door, it is likely that this needs to be active for a shorter amount of time. This is a process of trial and error, as every garage door opener is different based on manufacturer and model.
Step 5: Open your Garage Door!
You're ready to swipe! Can you think of a way to improve this system? Maybe you could add a keypad in case you forgot your RFID card? Maybe you want to add some lights and make it flashy when you swipe the tag? There's so much you can do! Do your thing, and let us know what you come up with!


