Automatically Open/Close a Box With a Linear Actuator Box © CC0
DESCRIPTION

There's a simple joy in pressing a button that opens a box for you. Sure there are quicker and more efficient ways to open a box, but nothing compares to the magic of an actuating lid. For this tutorial, we will be making a box that opens and closes using an Arduino and a small Linear Actuator.
Step 1: Program Your Board

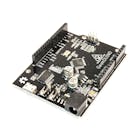
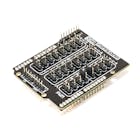
Grab the buttonBoxProject Sketch from Github. Open it in the Arduino IDE and upload it to your board. Plug your Linear Actuator and Pushbutton into the sensor shield as shown.
Plug the board into power, and the Linear Actuator should fully extend. You can press the button a few times at this point to get a feel for how this is going to work.
Step 2: Build


Drill some holes for your button and power jack. Keep in mind that these will jut into your box a bit, so keep them clear of where you plan to mount the linear actuator.
Mount your Arduino on the lid of the box, leaving room to get to the power and USB. This leaves us space for whatever we want to put in it later.
To mount the linear actuator: Set it to full extension. Find a place where the moving portion does not make contact with the box. Attach the mounting brackets to the end loops. Place where it will close the box when fully retracted. Retract the Linear Actuator, make sure you account for the length of the movement. If everything looks good, drill your pilot holes in the box and mount with wood screws
In the case of the treasure box I was using, if the edge of the squared portion of the linear actuator was flush with the edge of the bottom of the box, there was proper clearance for the linear actuator's head.
Step 3: Wiring


Wire your components as shown in the diagram.
Be sure to set your jumper for pins 9-11 to VIN.

Step 4: And you're done!
Revel in your creation! As you can see, there are tons of ports open to play with, so you can get creative by adding lights, buzzers, or anything you can think of, really. We kept it simple so as to not obscure the code used for the button and actuator.


There's a simple joy in pressing a button that opens a box for you. Sure there are quicker and more efficient ways to open a box, but nothing compares to the magic of an actuating lid. For this tutorial, we will be making a box that opens and closes using an Arduino and a small Linear Actuator.
Step 1: Program Your Board
Grab the buttonBoxProject Sketch from Github. Open it in the Arduino IDE and upload it to your board. Plug your Linear Actuator and Pushbutton into the sensor shield as shown.
Plug the board into power, and the Linear Actuator should fully extend. You can press the button a few times at this point to get a feel for how this is going to work.
Step 2: Build
Drill some holes for your button and power jack. Keep in mind that these will jut into your box a bit, so keep them clear of where you plan to mount the linear actuator.
Mount your Arduino on the lid of the box, leaving room to get to the power and USB. This leaves us space for whatever we want to put in it later.
To mount the linear actuator: Set it to full extension. Find a place where the moving portion does not make contact with the box. Attach the mounting brackets to the end loops. Place where it will close the box when fully retracted. Retract the Linear Actuator, make sure you account for the length of the movement. If everything looks good, drill your pilot holes in the box and mount with wood screws
In the case of the treasure box I was using, if the edge of the squared portion of the linear actuator was flush with the edge of the bottom of the box, there was proper clearance for the linear actuator's head.
Step 3: Wiring
Wire your components as shown in the diagram.
Be sure to set your jumper for pins 9-11 to VIN.
Step 4: And you're done!
Revel in your creation! As you can see, there are tons of ports open to play with, so you can get creative by adding lights, buzzers, or anything you can think of, really. We kept it simple so as to not obscure the code used for the button and actuator.
Github
