Connect Your Central Heating to Arduino © CC BY-NC-SA
DESCRIPTION
Have you ever wondered when and why is your boiler running and heating your home? Do you want to automate your heating system with Arduino? The OpenTherm shield is designed for you. It will allow you to monitor and control your OpenTherm boiler with Arduino.


Last year I wanted to combine my gas heating boiler with a fireplace regulator. My BAXI boiler and thermostat are pretty smart so I wanted naturally to extend the boiler to control the fireplace as well. I was sick of all those expensive official BAXI extensions that would allow me to do so.
So I built myself an OpenTherm gateway that allowed me to intercept the communication between thermostat and boiler and place an algorithm that would either fire a boiler or use heat from the fireplace - [more about the regulator].
Since there was a lot of people that wanted something similar I've decided to create a module - Arduino shield - that would allow anybody very easily to control their house heating.

- Create your own Arduino-based boiler with an existing OpenTherm thermostat. Most unlikely anybody would do that but it is possible.
- Use the shield to build your own Arduino-based thermostat to fully take over your boiler and home heating. Perfect for home automation. This application only requires an external 5V power supply.
- Place an OpenTherm shield into the lines between the existing boiler and thermostat and create a monitor to watch when and how the boiler is heating your home. You can even intercept the communication to for example wirelessly control the heating.
- OpenTherm allows having a man-in-the-middle (gateway) device that communicates with both boiler and thermostat. This is is how I used the shield to create an OpenTherm regulator.
- room temperature
- room temperature set point
- heating water temperature
- return water temperature
- domestic hot water temperature*
- domestic hot water pressure*
- domestic hot water flow rate*
- outside temperature*
- boiler status (running / not running / error)
- modulation level
- exhaust temperature*
- statistics how long the boiler was running
* note that these are available only if your boiler is equipped with necessary accessories
Building the shieldThe electronic circuit is based on OpenTherm gateway project which uses PIC microcontroller. I've adapted it for the Arduino and created a nice Arduino UNO compatible layout.

You can use above schematic and Gerber files to create the shield on your own. I'm manufacturing my boards by PCBWay - PCB Prototype the Easy Way. You can have them to create and ship these nice blue beauties just within a week. The blue solder mask is the same price as the basic green! I also love their customer service, nothing is a problem. Or you can order a prepacked DIY kit.

The first example will show you how to use the shield to create your own custom thermostat. What you need:
- OpenTherm boiler
- Arduino UNO, WeMos D1 or any Arduino UNO compatible board. The only requirement for the board is the support of pin interrupt on pin 2 and 3.
- 5V power supply. No need for 24V power supply in this setup since it's only needed if you communicate with a thermostat.
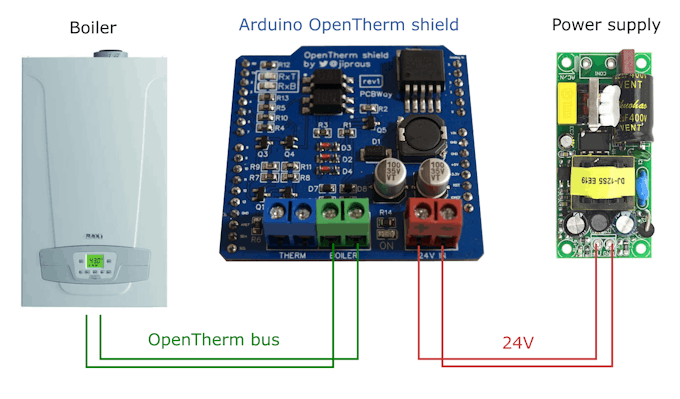
Connect your boiler with Arduino OpenTherm shield as shown on the picture above, attach the shield on your Arduino and you can start programming. Arduino OpenTherm IO library contains the following example to show you how to communicate with the boiler.
void loop() {
 if (OPENTHERM::isIdle()) {
   message.type = OT_MSGTYPE_READ_DATA;
   message.id = OT_MSGID_SLAVE_CONFIG;
   message.valueHB = 0;
   message.valueLB = 0;
   Serial.print("-> ");
   OPENTHERM::printToSerial(message);
   Serial.println();
   OPENTHERM::send(BOILER_OUT, message); // send message to boiler
 }
 else if (OPENTHERM::isSent()) {
   OPENTHERM::listen(BOILER_IN, 800); // wait for boiler to respond
 }
 else if (OPENTHERM::getMessage(message)) { // boiler responded
   OPENTHERM::stop();
   Serial.print("<- ");
   OPENTHERM::printToSerial(message);
   Serial.println();
   Serial.println();
   delay(100); // minimal delay before next communication
 }
 else if (OPENTHERM::isError()) {
   OPENTHERM::stop();
   Serial.println("<- Timeout");
   Serial.println();
 }
}
First, check whether there is no pending command with OPENTHERM::isIdle. If not you can send next one. In this example, you request the slave configuration flags. If the command was successfully sent you have to start listening for a reply from the boiler with OPENTHERM::listen call. Method OPENTHERM::getMessage will return true as soon as there is a pending reply from the slave and if something went wrong or timeout happened method OPENTHERM::isError return true. The library contains OpenTherm message structure that contains decoded data from the protocol so you do not need to care about the formats at all. Checkout the source code it is well documented. All the types of messages are listed in the constants or you can check the OpenTherm documentation.
struct OpenthermData { byte type; byte id; byte valueHB; byte valueLB; float f88(); void f88(float value); uint16_t u16(); void u16(uint16_t value); int16_t s16(); void s16(int16_t value); } The second example will show you how to attach a man-in-the-middle device to the OpenTherm bus to monitor the boiler and thermostat or intercept their communication. What you need:
- OpenTherm thermostat
- 24V 500mA power supply

Connect the shield into the bus between the boiler and thermostat as shown on the picture above. You can see that it interrupts the bus between these two devices. Now your communication is broken unless you upload a gateway software into your Arduino that will forward commands and replies form thermostat to the boiler and vice versa. Again there is an excellent example in the Arduino OpenTherm IO library.
void loop() {
 if (mode == MODE_LISTEN_MASTER) {
   if (OPENTHERM::isSent() || OPENTHERM::isIdle() || OPENTHERM::isError()) {
     OPENTHERM::listen(THERMOSTAT_IN);
   }
   else if (OPENTHERM::getMessage(message)) {
     Serial.print("-> ");
     OPENTHERM::printToSerial(message);
     Serial.println();
     OPENTHERM::send(BOILER_OUT, message); // forward message to boiler
     mode = MODE_LISTEN_SLAVE;
   }
 }
 else if (mode == MODE_LISTEN_SLAVE) {
   if (OPENTHERM::isSent()) {
     OPENTHERM::listen(BOILER_IN, 800); // reply need to be send back in 800ms
   }
   else if (OPENTHERM::getMessage(message)) {
     Serial.print("<- ");
     OPENTHERM::printToSerial(message);
     Serial.println();
     Serial.println();
     OPENTHERM::send(THERMOSTAT_OUT, message); // send message back to thermostat
     mode = MODE_LISTEN_MASTER;
   }
   else if (OPENTHERM::isError()) {
     mode = MODE_LISTEN_MASTER;
     Serial.println("<- Timeout");
     Serial.println();
   }
 }
}
The gateway simply starts listening for thermostat commands. If there is request detected it will parse it and forward it to the boiler. Gateway will now start to listening for boiler reply instead. If there is reply received in 800ms gateway will forward the reply back to the thermostat. Both thermostat and boiler will never know there is something extra between them. As you can see there is plenty of room to write your own code that can capture the messages and read useful information from them (status, temperatures, pressure, statistics,...). You can even override or throw away requests or replies you don't like.
As you can see it is really easy to communicate with your smart heating system and make it even smarter. In the next article I will show you more practical usage of this hardware in my OpenTherm regulator.

Have you ever wondered when and why is your boiler running and heating your home? Do you want to automate your heating system with Arduino? The OpenTherm shield is designed for you. It will allow you to monitor and control your OpenTherm boiler with Arduino.
Last year I wanted to combine my gas heating boiler with a fireplace regulator. My BAXI boiler and thermostat are pretty smart so I wanted naturally to extend the boiler to control the fireplace as well. I was sick of all those expensive official BAXI extensions that would allow me to do so.
So I built myself an OpenTherm gateway that allowed me to intercept the communication between thermostat and boiler and place an algorithm that would either fire a boiler or use heat from the fireplace - [more about the regulator].
Since there was a lot of people that wanted something similar I've decided to create a module - Arduino shield - that would allow anybody very easily to control their house heating.
- Create your own Arduino-based boiler with an existing OpenTherm thermostat. Most unlikely anybody would do that but it is possible.
- Use the shield to build your own Arduino-based thermostat to fully take over your boiler and home heating. Perfect for home automation. This application only requires an external 5V power supply.
- Place an OpenTherm shield into the lines between the existing boiler and thermostat and create a monitor to watch when and how the boiler is heating your home. You can even intercept the communication to for example wirelessly control the heating.
- OpenTherm allows having a man-in-the-middle (gateway) device that communicates with both boiler and thermostat. This is is how I used the shield to create an OpenTherm regulator.
- room temperature
- room temperature set point
- heating water temperature
- return water temperature
- domestic hot water temperature*
- domestic hot water pressure*
- domestic hot water flow rate*
- outside temperature*
- boiler status (running / not running / error)
- modulation level
- exhaust temperature*
- statistics how long the boiler was running
* note that these are available only if your boiler is equipped with necessary accessories
Building the shieldThe electronic circuit is based on OpenTherm gateway project which uses PIC microcontroller. I've adapted it for the Arduino and created a nice Arduino UNO compatible layout.
You can use above schematic and Gerber files to create the shield on your own. I'm manufacturing my boards by PCBWay - PCB Prototype the Easy Way. You can have them to create and ship these nice blue beauties just within a week. The blue solder mask is the same price as the basic green! I also love their customer service, nothing is a problem. Or you can order a prepacked DIY kit.
The first example will show you how to use the shield to create your own custom thermostat. What you need:
- OpenTherm boiler
- Arduino UNO, WeMos D1 or any Arduino UNO compatible board. The only requirement for the board is the support of pin interrupt on pin 2 and 3.
- 5V power supply. No need for 24V power supply in this setup since it's only needed if you communicate with a thermostat.
Connect your boiler with Arduino OpenTherm shield as shown on the picture above, attach the shield on your Arduino and you can start programming. Arduino OpenTherm IO library contains the following example to show you how to communicate with the boiler.
void loop() {
if (OPENTHERM::isIdle()) {
message.type = OT_MSGTYPE_READ_DATA;
message.id = OT_MSGID_SLAVE_CONFIG;
message.valueHB = 0;
message.valueLB = 0;
Serial.print("-> ");
OPENTHERM::printToSerial(message);
Serial.println();
OPENTHERM::send(BOILER_OUT, message); // send message to boiler
}
else if (OPENTHERM::isSent()) {
OPENTHERM::listen(BOILER_IN, 800); // wait for boiler to respond
}
else if (OPENTHERM::getMessage(message)) { // boiler responded
OPENTHERM::stop();
Serial.print("<- ");
OPENTHERM::printToSerial(message);
Serial.println();
Serial.println();
delay(100); // minimal delay before next communication
}
else if (OPENTHERM::isError()) {
OPENTHERM::stop();
Serial.println("<- Timeout");
Serial.println();
}
}
First, check whether there is no pending command with OPENTHERM::isIdle. If not you can send next one. In this example, you request the slave configuration flags. If the command was successfully sent you have to start listening for a reply from the boiler with OPENTHERM::listen call. Method OPENTHERM::getMessage will return true as soon as there is a pending reply from the slave and if something went wrong or timeout happened method OPENTHERM::isError return true. The library contains OpenTherm message structure that contains decoded data from the protocol so you do not need to care about the formats at all. Checkout the source code it is well documented. All the types of messages are listed in the constants or you can check the OpenTherm documentation.
struct OpenthermData {
byte type;
byte id;
byte valueHB;
byte valueLB;
float f88();
void f88(float value);
uint16_t u16();
void u16(uint16_t value);
int16_t s16();
void s16(int16_t value);
}
The second example will show you how to attach a man-in-the-middle device to the OpenTherm bus to monitor the boiler and thermostat or intercept their communication. What you need:
- OpenTherm thermostat
- 24V 500mA power supply
Connect the shield into the bus between the boiler and thermostat as shown on the picture above. You can see that it interrupts the bus between these two devices. Now your communication is broken unless you upload a gateway software into your Arduino that will forward commands and replies form thermostat to the boiler and vice versa. Again there is an excellent example in the Arduino OpenTherm IO library.
void loop() {
if (mode == MODE_LISTEN_MASTER) {
if (OPENTHERM::isSent() || OPENTHERM::isIdle() || OPENTHERM::isError()) {
OPENTHERM::listen(THERMOSTAT_IN);
}
else if (OPENTHERM::getMessage(message)) {
Serial.print("-> ");
OPENTHERM::printToSerial(message);
Serial.println();
OPENTHERM::send(BOILER_OUT, message); // forward message to boiler
mode = MODE_LISTEN_SLAVE;
}
}
else if (mode == MODE_LISTEN_SLAVE) {
if (OPENTHERM::isSent()) {
OPENTHERM::listen(BOILER_IN, 800); // reply need to be send back in 800ms
}
else if (OPENTHERM::getMessage(message)) {
Serial.print("<- ");
OPENTHERM::printToSerial(message);
Serial.println();
Serial.println();
OPENTHERM::send(THERMOSTAT_OUT, message); // send message back to thermostat
mode = MODE_LISTEN_MASTER;
}
else if (OPENTHERM::isError()) {
mode = MODE_LISTEN_MASTER;
Serial.println("<- Timeout");
Serial.println();
}
}
}
The gateway simply starts listening for thermostat commands. If there is request detected it will parse it and forward it to the boiler. Gateway will now start to listening for boiler reply instead. If there is reply received in 800ms gateway will forward the reply back to the thermostat. Both thermostat and boiler will never know there is something extra between them. As you can see there is plenty of room to write your own code that can capture the messages and read useful information from them (status, temperatures, pressure, statistics,...). You can even override or throw away requests or replies you don't like.
As you can see it is really easy to communicate with your smart heating system and make it even smarter. In the next article I will show you more practical usage of this hardware in my OpenTherm regulator.
Opentherm IO library for Arduino
