Control Up to 65,280 Relays with Your Arduino! © GPL3+
DESCRIPTION
Use the IO Expander and Relay Expander to control up to 65,280 relays.
Need to add a lot of relays to your project? Then you need the IO Expander with Relay Expanders. Each IO Expander can control up to 16 daisy chained Relay Expanders for a total of 256 relays. Then connecting 255 IO Expanders together you can selectively control up to 65,280 relays.
Control Relays with a Single IO Expander

Feature List
- Use cheap < $15 Arduino 16 relay boards.
- Easy to use relay control commands.
- Control an individual relay or a bank at a time.
- No driver required. Save code space.
- No data space to maintain relay state.
- No extra power supply needed.
Parts Needed to Build a Relay Bank
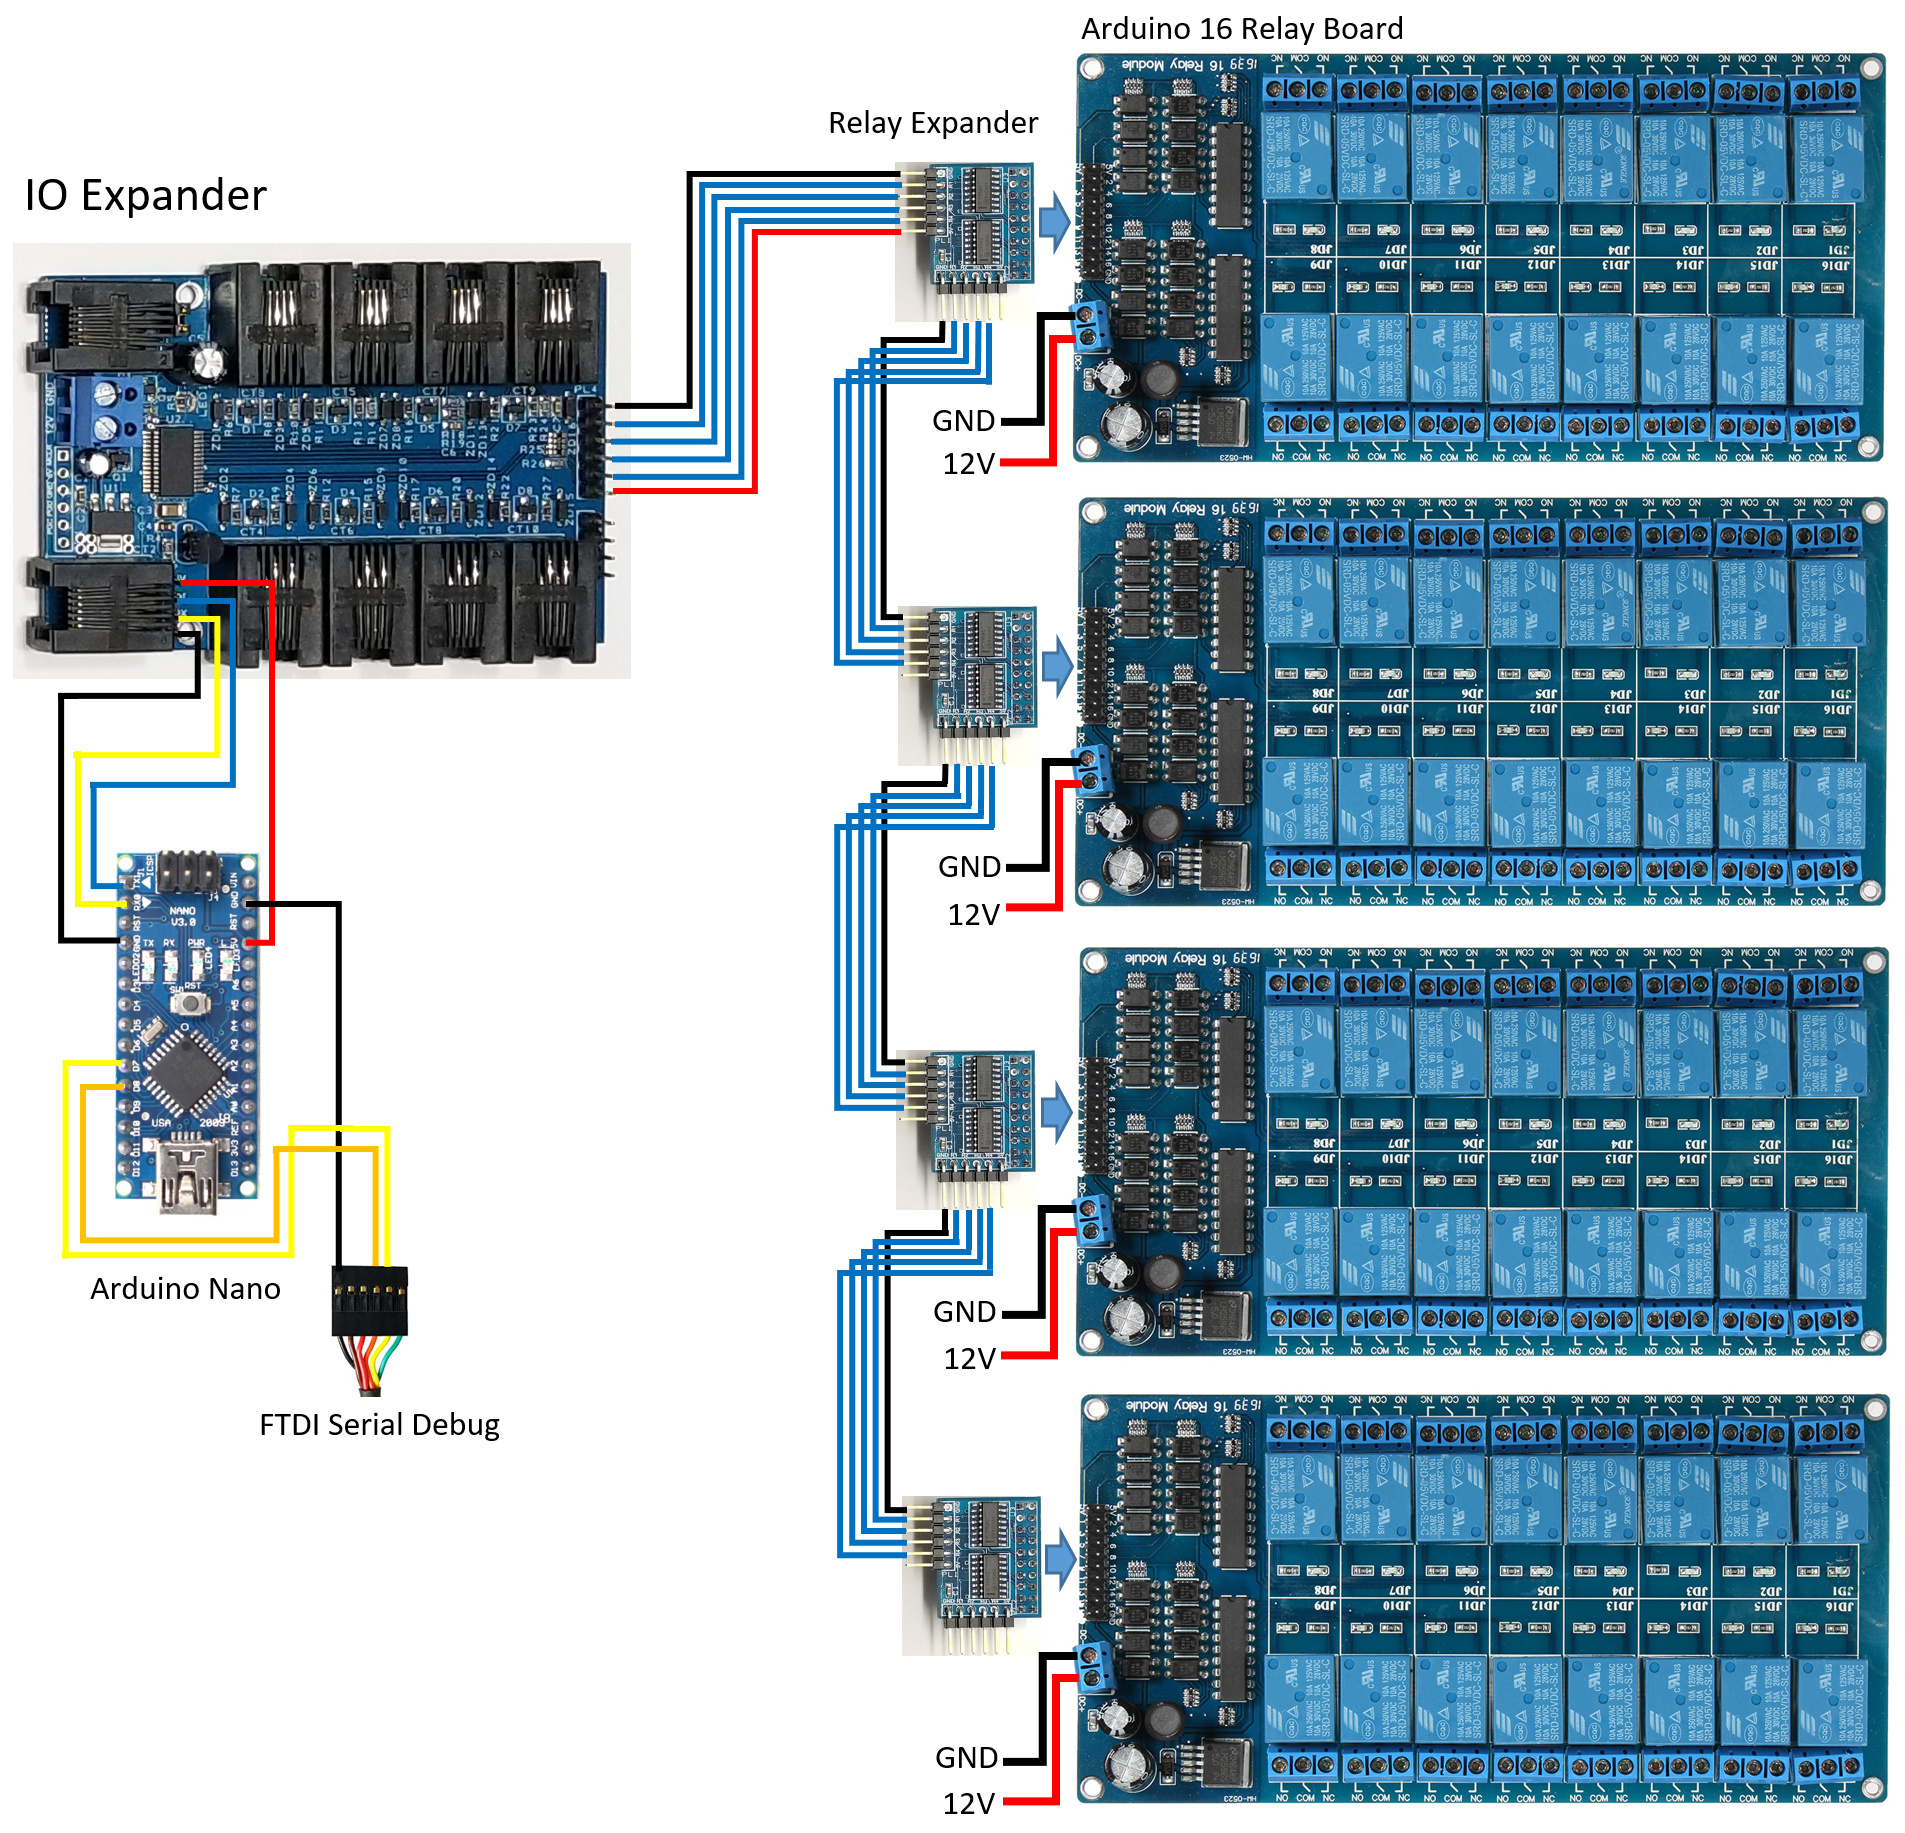
Wiring Diagram
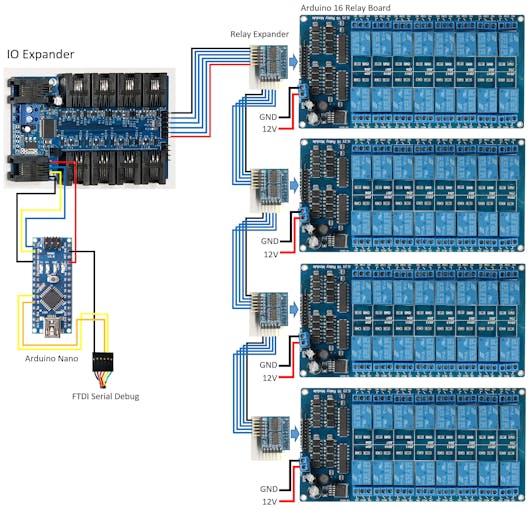
Note: In the above wiring diagram the IO Expander and Arduino Nano are being powered by the first relay board. All the Relay Expanders are powered from the relay board they are connected to.
/* IO Expander
*
* Control 64 Relays
*
*/
#include <SoftwareSerial.h>
#include "IOExpander.h"
#include <avr/wdt.h>
//#define SERIAL_DEBUG
#define MAX_RELAYS 64
#ifdef SERIAL_DEBUG
SoftwareSerial swSerial(8,7);
#endif
char cmd[10];
void setup()
{
 Serial.begin(115200);
#ifdef SERIAL_DEBUG
 swSerial.begin(115200);
 swSerialEcho = &swSerial;
#endif
 wdt_enable(WDTO_8S);
 sprintf(cmd, "eb%d", MAX_RELAYS / 16);
 SerialCmdDone(cmd);
}
void loop()
{
 static int i = 1;
 sprintf(cmd, "e%df", i);
 SerialCmdDone(cmd);
 if (i++ >= MAX_RELAYS) i = 1;
 sprintf(cmd, "e%do", i);
 SerialCmdDone(cmd);
 delay(100);
 wdt_reset();
}
Multiple IO Expanders Controlling Relays
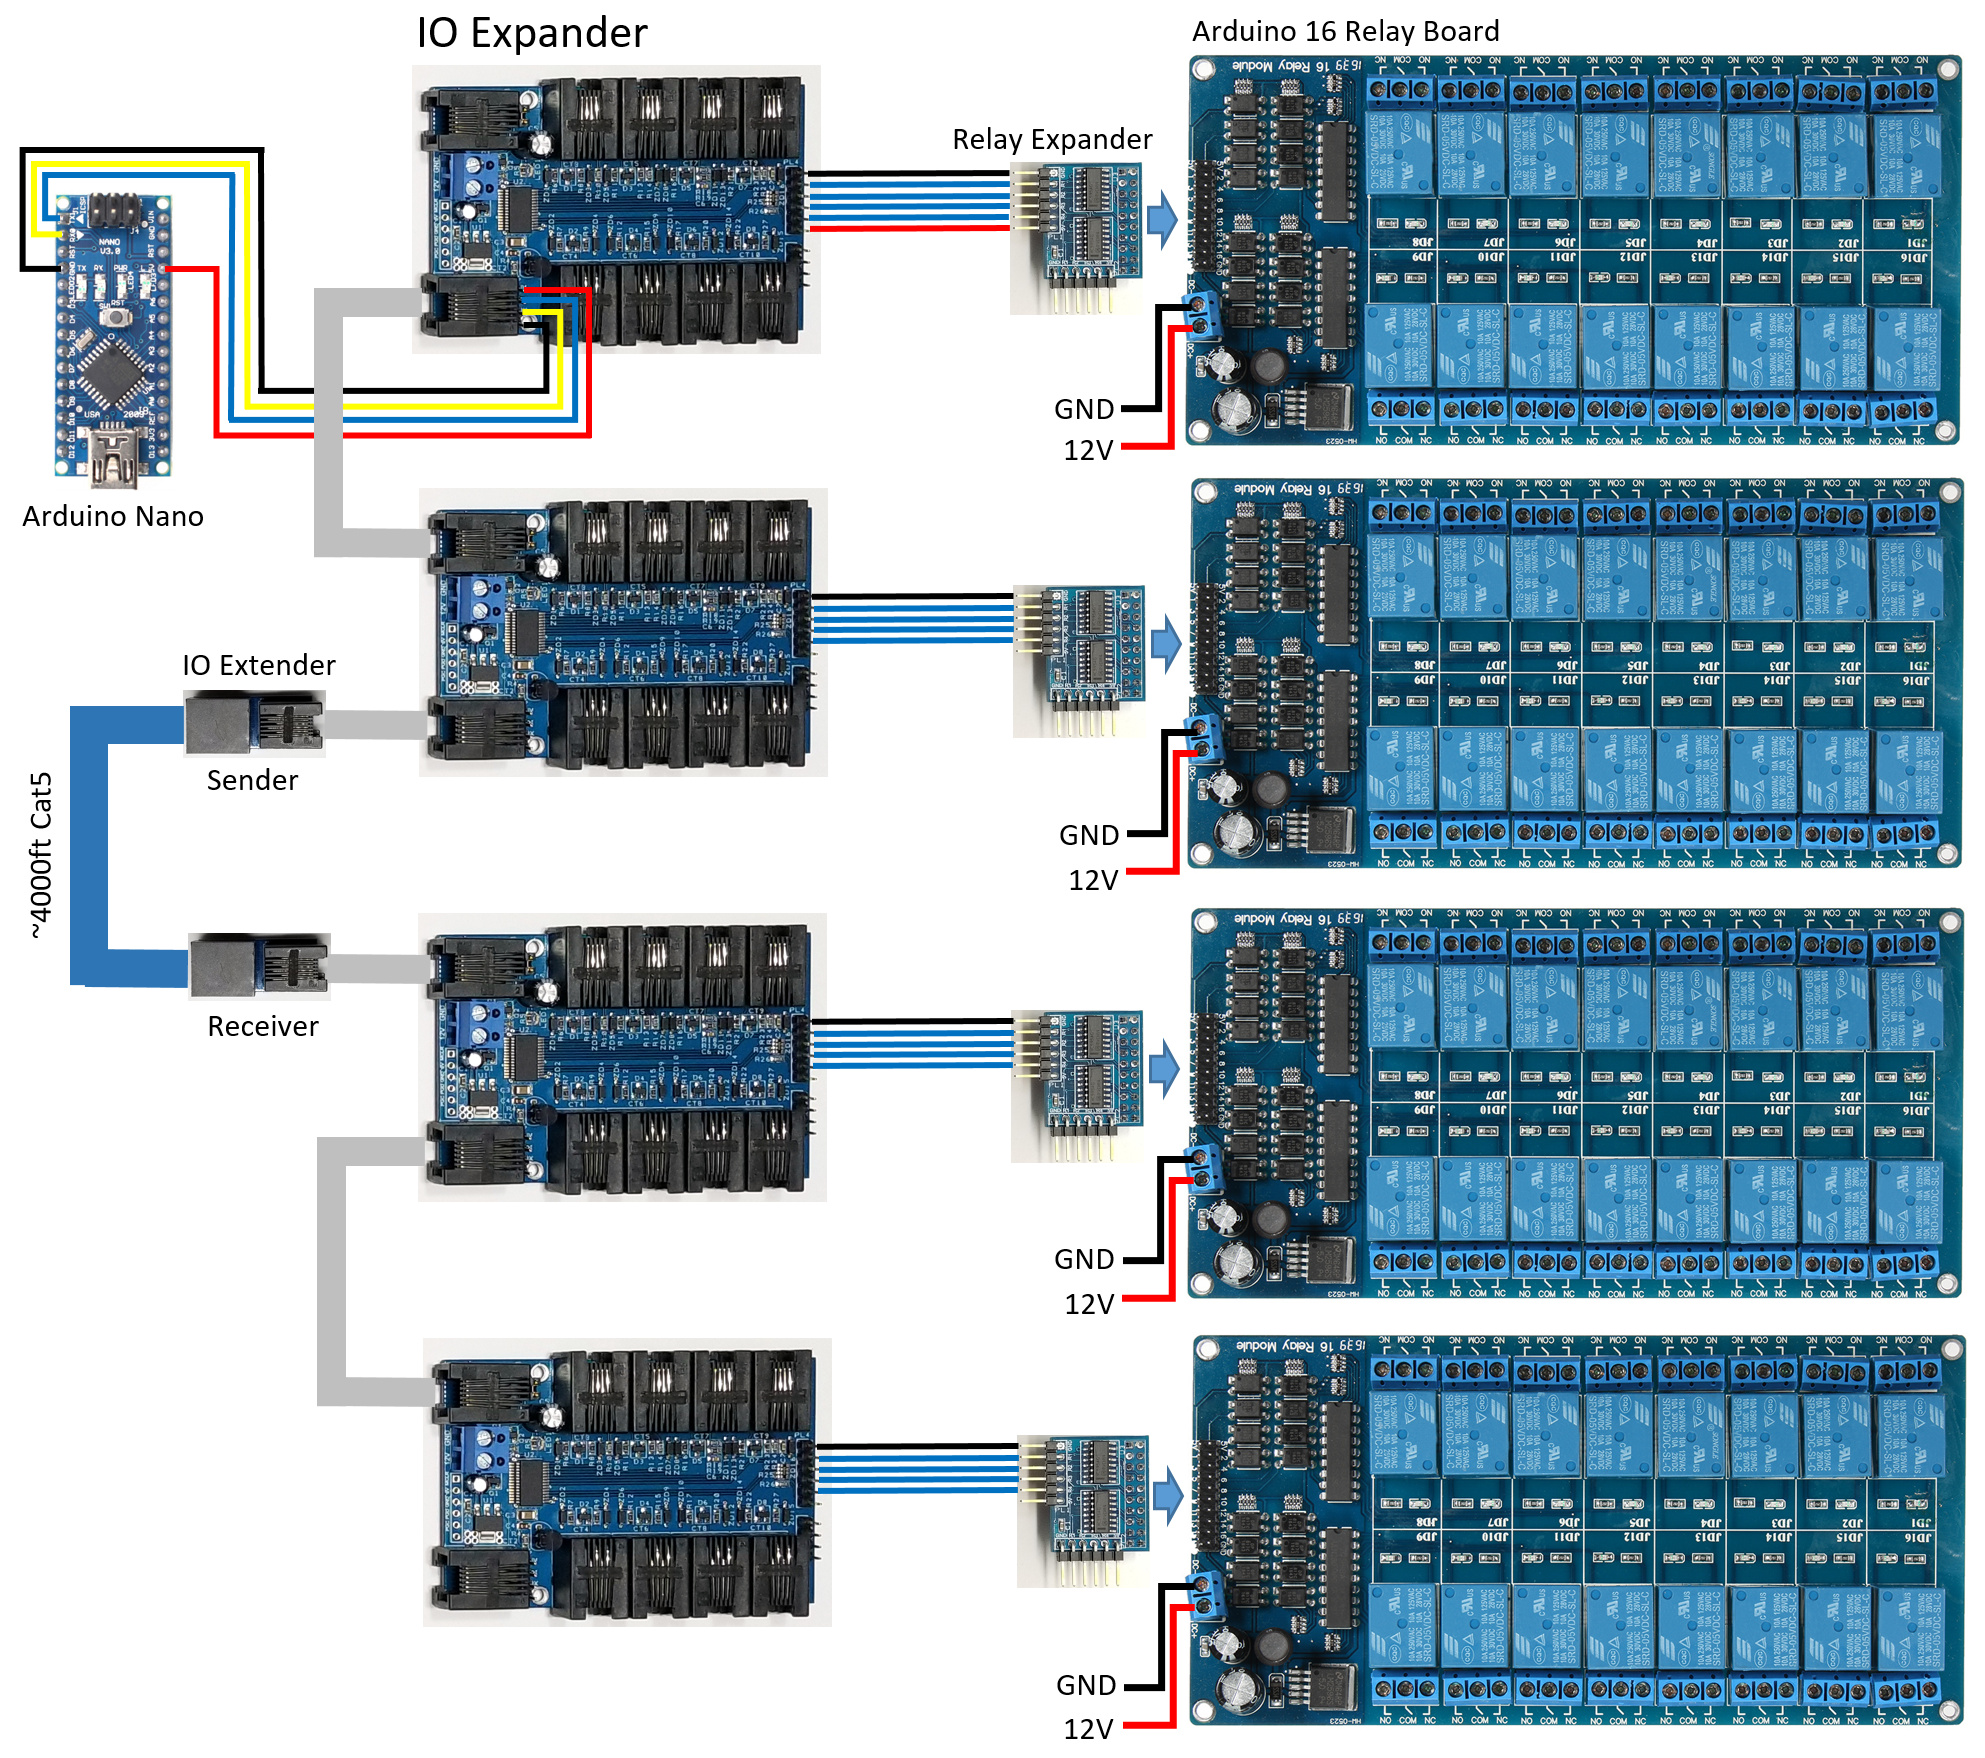
Another way to control relays is to use multiple IO Expanders. This gives us the ability to distribute sensors and relays to a central, or star network, but still interconnect all the IO Expanders on a single serial bus. If you have to separate the IO Expanders up to 4000ft then use the IO Extenders as shown below with the standard blue Cat5 network wire.
Wiring Diagram

Note: In the above wiring diagram all the IO Expanders and Arduino Nano are being powered by the first relay board through the serial bus. All the Relay Expanders are powered from the relay board they are connected to.
/* IO Expander
*
* Relay Bonnaza with IO Expanders!
*
*/
#include <HardwareSerial9Bit.h>
#include "IOExpander9Bit.h"
#include <avr/wdt.h>
#define MAX_BOARDS     4
char cmd[10];
void setup()
{
 Serial9Bit.begin(115200, SERIAL_9N1);
 Serial9Bit.write(0);                     // Set IO Expanders to 9-bit
 wdt_enable(WDTO_8S);
 for (int board = 1; board <= 4; board++)
   SerialCmdDone(board, "eb1");
}
void loop()
{
 static int board = 1;
 static int relay = 1;
 sprintf(cmd, "e%df", relay);
 SerialCmdDone(board, cmd);
 if (++relay > 16) {
   relay = 1;
   if (++board > MAX_BOARDS) board = 1;
 }
 sprintf(cmd, "e%do", relay);
 SerialCmdDone(board, cmd);
 delay(100);
 wdt_reset();
}
So Why Do I Need to Control So Many Relays?
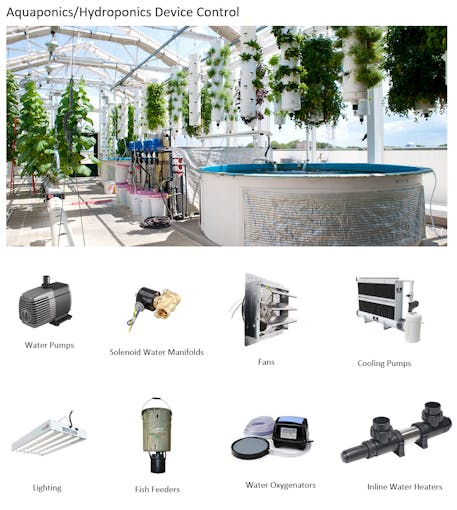
One such application is in aquaponics or hydroponics. Lots of sensors and devices need to be automated down to each grow bed or individual plant. This requires extreme IO and the IO Expander delivers.
So get your IO Expander today and build your system!

Use the IO Expander and Relay Expander to control up to 65,280 relays.
Need to add a lot of relays to your project? Then you need the IO Expander with Relay Expanders. Each IO Expander can control up to 16 daisy chained Relay Expanders for a total of 256 relays. Then connecting 255 IO Expanders together you can selectively control up to 65,280 relays.
Control Relays with a Single IO Expander
Feature List
- Use cheap < $15 Arduino 16 relay boards.
- Easy to use relay control commands.
- Control an individual relay or a bank at a time.
- No driver required. Save code space.
- No data space to maintain relay state.
- No extra power supply needed.
Parts Needed to Build a Relay Bank
Wiring Diagram
Note: In the above wiring diagram the IO Expander and Arduino Nano are being powered by the first relay board. All the Relay Expanders are powered from the relay board they are connected to.
/* IO Expander
 *
 * Control 64 Relays
 *
 */

#include <SoftwareSerial.h>
#include "IOExpander.h"
#include <avr/wdt.h>

//#define SERIAL_DEBUG
#define MAX_RELAYS 64

#ifdef SERIAL_DEBUG
SoftwareSerial swSerial(8,7);
#endif

char cmd[10];

void setup()
{
  Serial.begin(115200);
#ifdef SERIAL_DEBUG
  swSerial.begin(115200);
  swSerialEcho = &swSerial;
#endif
  wdt_enable(WDTO_8S);
  sprintf(cmd, "eb%d", MAX_RELAYS / 16);
  SerialCmdDone(cmd);
}

void loop()
{
  static int i = 1;

  sprintf(cmd, "e%df", i);
  SerialCmdDone(cmd);
  if (i++ >= MAX_RELAYS) i = 1;
  sprintf(cmd, "e%do", i);
  SerialCmdDone(cmd);

  delay(100);
  wdt_reset();
}
Multiple IO Expanders Controlling Relays
Another way to control relays is to use multiple IO Expanders. This gives us the ability to distribute sensors and relays to a central, or star network, but still interconnect all the IO Expanders on a single serial bus. If you have to separate the IO Expanders up to 4000ft then use the IO Extenders as shown below with the standard blue Cat5 network wire.
Wiring Diagram
Note: In the above wiring diagram all the IO Expanders and Arduino Nano are being powered by the first relay board through the serial bus. All the Relay Expanders are powered from the relay board they are connected to.
/* IO Expander
 *
 * Relay Bonnaza with IO Expanders!
 *
 */

#include <HardwareSerial9Bit.h>
#include "IOExpander9Bit.h"
#include <avr/wdt.h>

#define MAX_BOARDS     4

char cmd[10];

void setup()
{
  Serial9Bit.begin(115200, SERIAL_9N1);
  Serial9Bit.write(0);                     // Set IO Expanders to 9-bit
  wdt_enable(WDTO_8S);
  for (int board = 1; board <= 4; board++)
    SerialCmdDone(board, "eb1");
}

void loop()
{
  static int board = 1;
  static int relay = 1;

  sprintf(cmd, "e%df", relay);
  SerialCmdDone(board, cmd);
  if (++relay > 16) {
    relay = 1;
    if (++board > MAX_BOARDS) board = 1;
  }
  sprintf(cmd, "e%do", relay);
  SerialCmdDone(board, cmd);

  delay(100);
  wdt_reset();
}
So Why Do I Need to Control So Many Relays?
One such application is in aquaponics or hydroponics. Lots of sensors and devices need to be automated down to each grow bed or individual plant. This requires extreme IO and the IO Expander delivers.
So get your IO Expander today and build your system!