Levitate a Ping Pong Ball Using Arduino and Simulink © GPL3+
DESCRIPTION
This project utilizes Arduino and Simulink to control a blower fan, and levitate a ping pong ball to a specific height. It's a fun application that will help you learn about PID control and Simulink.
Hardware:You can wire the hardware according to the provided schematic or you can follow the steps detailed below.
- Connect the positive terminal of the battery to the power pin of the blower fan and the negative terminal of the battery will be connected to ground
- Connect 5V to the power pin of the infrared sensor, ground pin to the ground pin of the sensor and analog pin 4Hard to the output pin of the sensor
- Connect PWM pin 8 and a 1kΩ pull-down resistor to the gate pin of the IRLZ14 MOSFET
- Connect the source of the MOSFET to ground and the drain of the MOSFET to the ground pin of the blower fan.
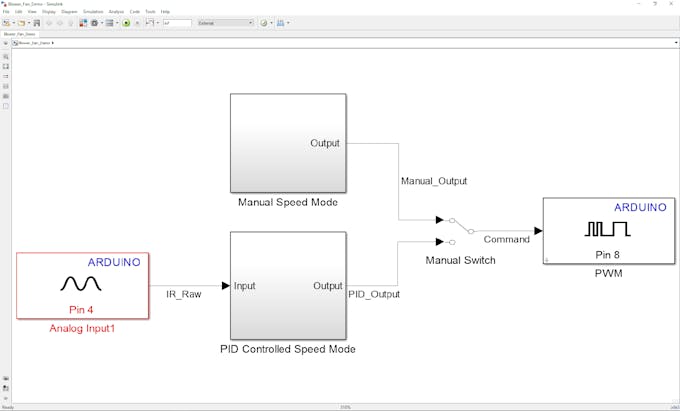
The speed of the blower fan can be controlled in two modes:
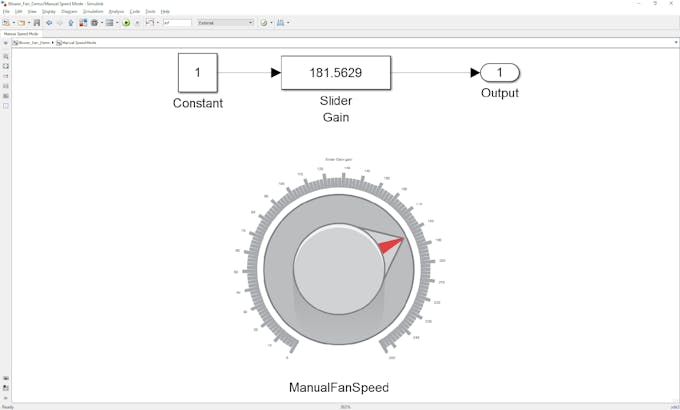
- Manual Mode: You control the height of the ping pong ball by adjusting the speed of the blower fan with a knob inside the Simulink model.
- PID Mode: The height of the ball is controlled by a PID controller that takes in data from an infrared sensor mounted on the top of the 3D printed tube. In order to accurately control the system, the PID's three gain parameters (proportional, integral and derivative) need to be tuned. You can easily adjust these parameters using the knobs in the Simulink model. Once the parameters are tuned, the PID will control the height of the ball.
When your PID control algorithm is complete you can download it to your Arduino with the click of a button, after which it runs standalone on the device (i.e. independent of Simulink). If you want, you can also use Simulink external mode to interactively refine PID gain parameters. The video linked below explains external mode in more detail.
Documentation and DemonstrationTo download the files for this project and see a video of the system in action, go to the following link:
 |
| × | 1 | |||
| × | 1 | ||||
| × | 1 | ||||
| × | 1 | ||||
| × | 1 | ||||
| × | 1 |
 |
|
This project utilizes Arduino and Simulink to control a blower fan, and levitate a ping pong ball to a specific height. It's a fun application that will help you learn about PID control and Simulink.
Hardware:You can wire the hardware according to the provided schematic or you can follow the steps detailed below.
- Connect the positive terminal of the battery to the power pin of the blower fan and the negative terminal of the battery will be connected to ground
- Connect 5V to the power pin of the infrared sensor, ground pin to the ground pin of the sensor and analog pin 4Hard to the output pin of the sensor
- Connect PWM pin 8 and a 1kΩ pull-down resistor to the gate pin of the IRLZ14 MOSFET
- Connect the source of the MOSFET to ground and the drain of the MOSFET to the ground pin of the blower fan.
The speed of the blower fan can be controlled in two modes:
- Manual Mode: You control the height of the ping pong ball by adjusting the speed of the blower fan with a knob inside the Simulink model.
- PID Mode: The height of the ball is controlled by a PID controller that takes in data from an infrared sensor mounted on the top of the 3D printed tube. In order to accurately control the system, the PID's three gain parameters (proportional, integral and derivative) need to be tuned. You can easily adjust these parameters using the knobs in the Simulink model. Once the parameters are tuned, the PID will control the height of the ball.
When your PID control algorithm is complete you can download it to your Arduino with the click of a button, after which it runs standalone on the device (i.e. independent of Simulink). If you want, you can also use Simulink external mode to interactively refine PID gain parameters. The video linked below explains external mode in more detail.
Documentation and DemonstrationTo download the files for this project and see a video of the system in action, go to the following link:


