Making your own Infrared Controller with Arduino © CC0
DESCRIPTION

Have a robot that would benefit from a customized controller? Tiny remotes not doing your project justice? Maybe your project would benefit from the use of joysticks instead of itty bitty buttons? In this project, we will be making our own Infrared Controller with two joysticks, two face buttons, and two trigger buttons that you can use to control just about anything with an infrared receiver! Let's get going!
Now, obviously this controller needs a device to pair up with. If you're building a robot with arduino, we suggest using something like the RobotGeek IR Receiver to pick up signal from the controller.
You can pair this controller up with just about any IR controlled device, so long as you have the original remote to copy the signal codes from!
Step 1: Assembly / Wiring


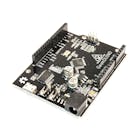
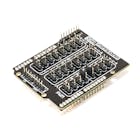
Here is an example layout, putting the two joysticks, two buttons, and IR Transmitter on the top of the workbench. On the bottom, we mounted the Geekduino & Sensor Shield, battery holder, and two trigger buttons. You can lay it out however you like, this is just a recommendation.
Follow the diagram and use this table to wire up your controller.

Step 2: Programming the Controller
The IRLib Library and Custom IR Controller Sketch are included in the RobotGeek Libraries and Tools. Download and extract it to your Arduino folder.
To get it up and running, all you need to do is open:
File → Sketchbook → RobotGeekSketches → Demos → IR → IRcustomController and upload it to your board.
We could move on, but let's take a quick look at the code to get an idea of what we're working with.
const int Set_Protocol = NEC;
//Left Joystick
  const unsigned long  L_JOY_RIGHT_ARROW = 0xFFC23D;
  const unsigned long  L_JOY_LEFT_ARROW = 0xFF22DD;
  const unsigned long  L_JOY_UP_ARROW = 0xFF629D;
  const unsigned long  L_JOY_DOWN_ARROW = 0xFFA857;
//Right Joystick
  const unsigned long  R_JOY_RIGHT_ARROW = 0xFD50AF;
  const unsigned long  R_JOY_LEFT_ARROW = 0xFD10EF;
  const unsigned long  R_JOY_UP_ARROW = 0xFDA05F;
  const unsigned long  R_JOY_DOWN_ARROW = 0xFDB04F;
//Buttons
  const unsigned long  L_FACE_BUTTON = 0xFF02FD;
  const unsigned long  R_FACE_BUTTON = 0xFF6897;
  const unsigned long  L_TRIGGER_BUTTON = 0xFFB04F;
  const unsigned long  R_TRIGGER_BUTTON = 0xFF52AD;
So here, we're defining the protocol we'll be using to send the command, then setting a list of unsigned long constants. The 6 characters after the 0x are what we're sending. These specific values were borrowed from two separate mini IR remotes, but can be different values depending on what you'd like to control. If you want to make a replacement controller for your device, you can learn about grabbing IR codes from another remote in this instructable.
Step 3: Programming your Device
You can see some examples of code that uses an IR receiver in the Turret and Rover with IR Remote Instructables. Taking a look at this code, you can see that the IRLib library decodes the signal based on the selected remote in the remotes.h file, and simple if/else if statements are used to handle the specifics of the command. This instructable can teach you a little bit more about using an IR Receiver.
Step 4: You're all set!
What will you control with your new infrared controller? Can you think of other layouts that might work better for different devices? What about adding a light so you know when you're sending data, or a buzzer to let you know when the remote is on and hasn't been used in a while? There are so many things to do, we'd love to hear what you come up with!


Have a robot that would benefit from a customized controller? Tiny remotes not doing your project justice? Maybe your project would benefit from the use of joysticks instead of itty bitty buttons? In this project, we will be making our own Infrared Controller with two joysticks, two face buttons, and two trigger buttons that you can use to control just about anything with an infrared receiver! Let's get going!
Now, obviously this controller needs a device to pair up with. If you're building a robot with arduino, we suggest using something like the RobotGeek IR Receiver to pick up signal from the controller.
You can pair this controller up with just about any IR controlled device, so long as you have the original remote to copy the signal codes from!
Step 1: Assembly / Wiring
Here is an example layout, putting the two joysticks, two buttons, and IR Transmitter on the top of the workbench. On the bottom, we mounted the Geekduino & Sensor Shield, battery holder, and two trigger buttons. You can lay it out however you like, this is just a recommendation.
Follow the diagram and use this table to wire up your controller.
Step 2: Programming the Controller
The IRLib Library and Custom IR Controller Sketch are included in the RobotGeek Libraries and Tools. Download and extract it to your Arduino folder.
To get it up and running, all you need to do is open:
File → Sketchbook → RobotGeekSketches → Demos → IR → IRcustomController
and upload it to your board.
We could move on, but let's take a quick look at the code to get an idea of what we're working with.
const int Set_Protocol = NEC;
//Left Joystick
  const unsigned long  L_JOY_RIGHT_ARROW = 0xFFC23D;
  const unsigned long  L_JOY_LEFT_ARROW = 0xFF22DD;
  const unsigned long  L_JOY_UP_ARROW = 0xFF629D;
  const unsigned long  L_JOY_DOWN_ARROW = 0xFFA857;
//Right Joystick
  const unsigned long  R_JOY_RIGHT_ARROW = 0xFD50AF;
  const unsigned long  R_JOY_LEFT_ARROW = 0xFD10EF;
  const unsigned long  R_JOY_UP_ARROW = 0xFDA05F;
  const unsigned long  R_JOY_DOWN_ARROW = 0xFDB04F;
//Buttons
  const unsigned long  L_FACE_BUTTON = 0xFF02FD;
  const unsigned long  R_FACE_BUTTON = 0xFF6897;
  const unsigned long  L_TRIGGER_BUTTON = 0xFFB04F;
  const unsigned long  R_TRIGGER_BUTTON = 0xFF52AD;
So here, we're defining the protocol we'll be using to send the command, then setting a list of unsigned long constants. The 6 characters after the 0x are what we're sending. These specific values were borrowed from two separate mini IR remotes, but can be different values depending on what you'd like to control. If you want to make a replacement controller for your device, you can learn about grabbing IR codes from another remote in this instructable.
Step 3: Programming your Device
You can see some examples of code that uses an IR receiver in the Turret and Rover with IR Remote Instructables. Taking a look at this code, you can see that the IRLib library decodes the signal based on the selected remote in the remotes.h file, and simple if/else if statements are used to handle the specifics of the command. This instructable can teach you a little bit more about using an IR Receiver.
Step 4: You're all set!
What will you control with your new infrared controller? Can you think of other layouts that might work better for different devices? What about adding a light so you know when you're sending data, or a buzzer to let you know when the remote is on and hasn't been used in a while? There are so many things to do, we'd love to hear what you come up with!