Pushup Counter © GPL3+
DESCRIPTION
Introduction:
Smart fitness IoT tools are gaining more and more traction, after Pelaton went IPO, it proves there are a lot of rooms for fitness market. Focusing on exercise not only improves market, it also improves overall health and fitness of the entire population.

While we can track cycling with Pelaton, running/walking with fitbit, some of the basic exercise such as push ups are still relatively hard to track. In this article, we are building a prototype of push up counter using kemet pyroelectric sensor and Arduino.

Step 1: Setup Arduino and Pyro Sensor
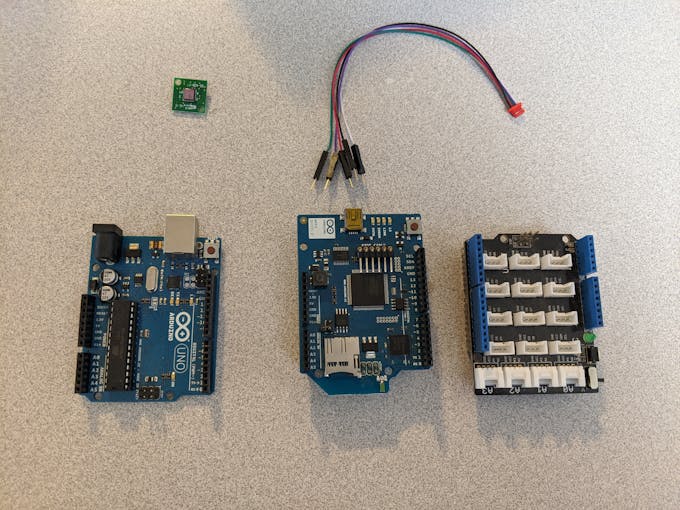
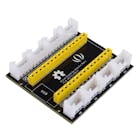
To do this project we will use Arduino Uno, Wifi Shield and Grove shield so we can add additional sensors.
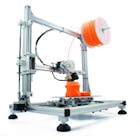
Next we can print out the case from thingsverse.

Through 3D printing, we'd have a basic buildup to connect with.
_S5lZY4kTl8.gif?auto=compress&gifq=35&w=680&h=510&fit=max)
After all is done we should have something like this.
_RXRb0KWmfQ.jpg?auto=compress%2Cformat&w=680&h=510&fit=max)
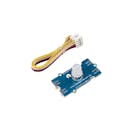
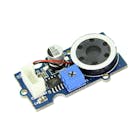
Connect all the pieces and we should have following

The pin assignment is from right to left, with pin 1 being power, pin 5 being GND and pin4 is Vout.

With that's all done, we can start moving onto next step.

Step 2: Test out the sensor
We can first try with the code that was given to us by the official site from https://ec.kemet.com/blog/pyro-switch-hidden-ir-detection/
int Pyro = A1;
unsigned long PyroRead = 0;
unsigned long IR_threshold = 198000;
// Note: SS-430 has two pulses of 200msec per detection.
// IR_threshold is in microsec (usec), therefore 198msec threshold
int LED = 7;
int Detected = LOW;
int IR_sensed = 0;
void setup() {
pinMode (7, OUTPUT); //LED Connected to Pin 7
pinMode (A1,INPUT); // IR Sensor connected to A1
}
void loop() {
while ((IR_sensed < 2)){ //Break after 2 good triggers PyroRead = pulseIn(A1, HIGH); //Measure trigger point if(PyroRead > IR_threshold){ //Make sure trigger is over 198msec)
IR_sensed++; //Mark as a good trigger
}
}
if (Detected == HIGH){ // Turn LED OFF if it was previous ON
Detected = LOW;
digitalWrite(7, LOW);
}
else {
Detected = HIGH; // Turn LED ON if it was previous OFF
digitalWrite(7, HIGH);
}
PyroRead = 0; // Reset readings
IR_sensed = 0;
delay(1000); // Accept triggers after a second
But as you can see, this really does not work. This is due to the sensitivity of the raw sensor. At this point you should at least able to know that sensor is connected and working correctly.
_iAMrBSLU6N.gif?auto=compress&gifq=35&w=680&h=510&fit=max)
Schema at this point would be

Step 3: Kemet SS-430 Lens
As we've seen from previous step that the sensor is jumping all over the place due to it's sensitivity, additional lenses are needed for us to make the sensor actually work.

For our test, we put a piece of acrylic covering the sensor itself and running with the same code, we would receive a much more accurate reading.
_89CxvzrJ8K.gif?auto=compress&gifq=35&w=680&h=510&fit=max)
While browsing through the discussion board, GeoNomad has made a 3D printable Lenses on TinkerCad, we can add that to this project. This is able to block all the other angles so we can focus on one single angle.
_dYmbb106X5.gif?auto=compress&gifq=35&w=680&h=510&fit=max)
Step 4: Data storage
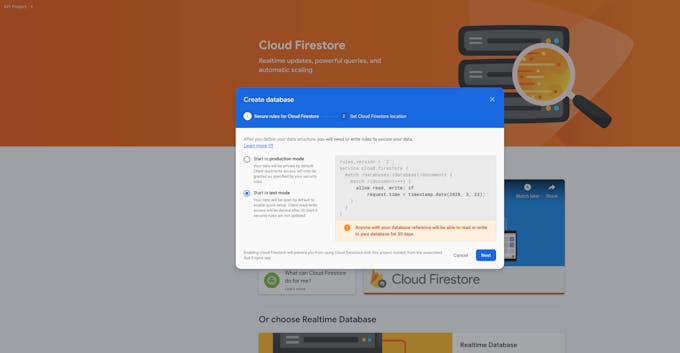
Now that sensor is running and we can track our push ups, we need to store our progress for our pushups, one of the easiest way is firebase. For this article we will go through using firebase through simple ways. Go through create a project like normal CP then create a database with test enviroment.
Next start a collection of pushups

We can then add our schema, which includes pushup count and timestamp.

When all is done, we will have our normal database setup.

You would also need a service account key being generated through firebase. Please do not upload this key to the repo, as it is a secure key.

Once it's connected, we can create a local relay on our server to make firebase transfer.
const http = require('http');
const url = require('url');
const querystring = require('querystring');
// Import Admin SDK
var admin = require("firebase-admin");
var serviceAccount = require("path/to/serviceAccountKey.json");
admin.initializeApp({
credential: admin.credential.cert(serviceAccount),
databaseURL: "https://databaseName.firebaseio.com"
});
// Get a database reference to our blog
var db = admin.database();
var ref = db.ref("pushup");
ref.once("value", function(snapshot) {
console.log(snapshot.val());
});
const hostname = '192.168.1.12';
const port = 3000;
const server = http.createServer((req, res) => {
const queryObject = url.parse(req.url,true).query;
var dt = new Date();
var utcDate = dt.toUTCString();
if(queryObject != null && queryObject.pushup != null)
{
console.log(queryObject.pushup);
var newPostRef = ref.push().set({
count: queryObject.pushup,
time: utcDate
});
var postId = newPostRef.key;
console.log(postId);
console.log(utcDate);
}
//console.log(querystring.parse(queryObject));
res.statusCode = 200;
res.setHeader('Content-Type', 'text/plain');
res.end('Hello World');
});
server.listen(port, hostname, () => {
console.log(`Server running at http://${hostname}:${port}/`);
});
Simply run
node app.jsand we can use this local to relay the firebase.
Step 5: Arduino intergration
Now that we can count our pushups, we can store our pushups, this is time for everything to come together. First, we will need to utilize the Arduino wifi shield to connect to the internet.
#include <WiFi.h>

char ssid[] = "yourNetwork"; // your network SSID (name)
char pass[] = "12345678"; // your network password
int status = WL_IDLE_STATUS; // the Wifi radio's status

void setup() {
 // initialize serial:
 Serial.begin(9600);

 // attempt to connect using WPA2 encryption:
 Serial.println("Attempting to connect to WPA network...");
 status = WiFi.begin(ssid, pass);

 // if you're not connected, stop here:
 if ( status != WL_CONNECTED) {
 Serial.println("Couldn't get a wifi connection");
 while(true);
 }
 // if you are connected, print out info about the connection:
 else {
 Serial.println("Connected to network");
 }
}

void loop() {
 // do nothing
}
We are now also adding a green LED, Buzzer, and a button. In setup we need to have all of these. Once Wifi is connected, we can blink the green LED 3 times.
void setup() {
// declare the ledPin as an OUTPUT:
Serial.begin(115200);
pinMode(ledPin, OUTPUT);
pinMode(greenledPin, OUTPUT);
pinMode(buzzerPin, OUTPUT);
pinMode (sensorPin, INPUT); // IR Sensor connected to A1
pinMode (buttonPin, INPUT); // Button Pin
// attempt to connect using WPA2 encryption:
Serial.println("Attempting to connect to WPA network...");
status = WiFi.begin(ssid, pass);
// if you're not connected, stop here:
if ( status != WL_CONNECTED) {
Serial.println("Couldn't get a wifi connection");
while(true);
}
// if you are connected, print out info about the connection:
else {
Serial.println("Connected to network");
//connected to network, blink it 3 times
digitalWrite(greenledPin, HIGH);
delay(500);
digitalWrite(greenledPin, LOW);
delay(500);
digitalWrite(greenledPin, HIGH);
delay(500);
digitalWrite(greenledPin, LOW);
delay(500);
digitalWrite(greenledPin, HIGH);
delay(500);
digitalWrite(greenledPin, LOW);
}
}
Next part is buzzer, everytime you complete a pushup, a buzzer will beep once to remind you you have finished a pushup. A pushup counter will also be used for sending in the info.
if (Detected == HIGH) { // Turn LED OFF if it was previous ON
Detected = LOW;
digitalWrite(ledPin, LOW);
digitalWrite(buzzerPin, HIGH);
delay(200);
digitalWrite(buzzerPin, LOW);
pushupCount += 1;
}
else {
Detected = HIGH; // Turn LED ON if it was previous OFF
digitalWrite(ledPin, HIGH);
}
The button is used for uploading the information to the local server and sending it to firebase. We'd also be clearing up pushupCount flag since we are sending that information to the server.
while ((IR_sensed < 2)) { //Break after 2 good triggers
PyroRead = pulseIn(sensorPin, HIGH); //Measure trigger point
Serial.println(PyroRead); // stop the autonomous robot
if (PyroRead > IR_threshold) { //Make sure trigger is over 198msec)
IR_sensed++; //Mark as a good trigger
}
buttonState = digitalRead(buttonPin);
if (buttonState == HIGH) {
// turn LED on:
digitalWrite(greenledPin, HIGH);
String tmp;
tmp = String(pushupCount);
Serial.println("\nStarting connection to server...");
// if you get a connection, report back via serial:
if (client.connect(server, 3000)) {
Serial.println("connected to server");
// Make a HTTP request:
client.println("GET /?pushup=" + tmp + " HTTP/1.1");
client.println("Host: 192.168.1.12");
client.println("Connection: close");
client.println();
}
digitalWrite(greenledPin, LOW);
pushupCount = 0;
}
}
When all the sensors are attached it should look something like following.

Step 6: Demo
Now that we have everything done finished, we can proceed to demo.


 |
|

Introduction:
Smart fitness IoT tools are gaining more and more traction, after Pelaton went IPO, it proves there are a lot of rooms for fitness market. Focusing on exercise not only improves market, it also improves overall health and fitness of the entire population.
While we can track cycling with Pelaton, running/walking with fitbit, some of the basic exercise such as push ups are still relatively hard to track. In this article, we are building a prototype of push up counter using kemet pyroelectric sensor and Arduino.
Step 1: Setup Arduino and Pyro Sensor
To do this project we will use Arduino Uno, Wifi Shield and Grove shield so we can add additional sensors.
Next we can print out the case from thingsverse.
Through 3D printing, we'd have a basic buildup to connect with.
After all is done we should have something like this.
Connect all the pieces and we should have following
The pin assignment is from right to left, with pin 1 being power, pin 5 being GND and pin4 is Vout.
With that's all done, we can start moving onto next step.
Step 2: Test out the sensor
We can first try with the code that was given to us by the official site from https://ec.kemet.com/blog/pyro-switch-hidden-ir-detection/
int Pyro = A1;
unsigned long PyroRead = 0;
unsigned long IR_threshold = 198000;
// Note: SS-430 has two pulses of 200msec per detection.
// IR_threshold is in microsec (usec), therefore 198msec threshold
int LED = 7;
int Detected = LOW;
int IR_sensed = 0;
void setup() {
pinMode (7, OUTPUT); //LED Connected to Pin 7
pinMode (A1,INPUT); // IR Sensor connected to A1
}
void loop() {
while ((IR_sensed < 2)){ //Break after 2 good triggers PyroRead = pulseIn(A1, HIGH); //Measure trigger point if(PyroRead > IR_threshold){ //Make sure trigger is over 198msec)
IR_sensed++; //Mark as a good trigger
}
}
if (Detected == HIGH){ // Turn LED OFF if it was previous ON
Detected = LOW;
digitalWrite(7, LOW);
}
else {
Detected = HIGH; // Turn LED ON if it was previous OFF
digitalWrite(7, HIGH);
}
PyroRead = 0; // Reset readings
IR_sensed = 0;
delay(1000); // Accept triggers after a second
But as you can see, this really does not work. This is due to the sensitivity of the raw sensor. At this point you should at least able to know that sensor is connected and working correctly.
Schema at this point would be
Step 3: Kemet SS-430 Lens
As we've seen from previous step that the sensor is jumping all over the place due to it's sensitivity, additional lenses are needed for us to make the sensor actually work.
For our test, we put a piece of acrylic covering the sensor itself and running with the same code, we would receive a much more accurate reading.
While browsing through the discussion board, GeoNomad has made a 3D printable Lenses on TinkerCad, we can add that to this project. This is able to block all the other angles so we can focus on one single angle.
Step 4: Data storage
Now that sensor is running and we can track our push ups, we need to store our progress for our pushups, one of the easiest way is firebase. For this article we will go through using firebase through simple ways. Go through create a project like normal CP then create a database with test enviroment.
Next start a collection of pushups
We can then add our schema, which includes pushup count and timestamp.
When all is done, we will have our normal database setup.
You would also need a service account key being generated through firebase. Please do not upload this key to the repo, as it is a secure key.
Once it's connected, we can create a local relay on our server to make firebase transfer.
const http = require('http');
const url = require('url');
const querystring = require('querystring');
// Import Admin SDK
var admin = require("firebase-admin");
var serviceAccount = require("path/to/serviceAccountKey.json");
admin.initializeApp({
credential: admin.credential.cert(serviceAccount),
databaseURL: "https://databaseName.firebaseio.com"
});
// Get a database reference to our blog
var db = admin.database();
var ref = db.ref("pushup");
ref.once("value", function(snapshot) {
console.log(snapshot.val());
});
const hostname = '192.168.1.12';
const port = 3000;
const server = http.createServer((req, res) => {
const queryObject = url.parse(req.url,true).query;
var dt = new Date();
var utcDate = dt.toUTCString();
if(queryObject != null && queryObject.pushup != null)
{
console.log(queryObject.pushup);
var newPostRef = ref.push().set({
count: queryObject.pushup,
time: utcDate
});
var postId = newPostRef.key;
console.log(postId);
console.log(utcDate);
}
//console.log(querystring.parse(queryObject));
res.statusCode = 200;
res.setHeader('Content-Type', 'text/plain');
res.end('Hello World');
});
server.listen(port, hostname, () => {
console.log(`Server running at http://${hostname}:${port}/`);
});
Simply run
node app.jsand we can use this local to relay the firebase.
Step 5: Arduino intergration
Now that we can count our pushups, we can store our pushups, this is time for everything to come together. First, we will need to utilize the Arduino wifi shield to connect to the internet.
#include <WiFi.h>

char ssid[] = "yourNetwork";   //  your network SSID (name)
char pass[] = "12345678";  // your network password
int status = WL_IDLE_STATUS;   // the Wifi radio's status

void setup() {
  // initialize serial:
  Serial.begin(9600);

  // attempt to connect using WPA2 encryption:
  Serial.println("Attempting to connect to WPA network...");
  status = WiFi.begin(ssid, pass);

  // if you're not connected, stop here:
  if ( status != WL_CONNECTED) {
  Serial.println("Couldn't get a wifi connection");
  while(true);
  }
  // if you are connected, print out info about the connection:
  else {
  Serial.println("Connected to network");
  }
}

void loop() {
  // do nothing
}
We are now also adding a green LED, Buzzer, and a button. In setup we need to have all of these. Once Wifi is connected, we can blink the green LED 3 times.
void setup() {
// declare the ledPin as an OUTPUT:
Serial.begin(115200);
pinMode(ledPin, OUTPUT);
pinMode(greenledPin, OUTPUT);
pinMode(buzzerPin, OUTPUT);
pinMode (sensorPin, INPUT); // IR Sensor connected to A1
pinMode (buttonPin, INPUT); // Button Pin
// attempt to connect using WPA2 encryption:
Serial.println("Attempting to connect to WPA network...");
status = WiFi.begin(ssid, pass);
// if you're not connected, stop here:
if ( status != WL_CONNECTED) {
Serial.println("Couldn't get a wifi connection");
while(true);
}
// if you are connected, print out info about the connection:
else {
Serial.println("Connected to network");
//connected to network, blink it 3 times
digitalWrite(greenledPin, HIGH);
delay(500);
digitalWrite(greenledPin, LOW);
delay(500);
digitalWrite(greenledPin, HIGH);
delay(500);
digitalWrite(greenledPin, LOW);
delay(500);
digitalWrite(greenledPin, HIGH);
delay(500);
digitalWrite(greenledPin, LOW);
}
}
Next part is buzzer, everytime you complete a pushup, a buzzer will beep once to remind you you have finished a pushup. A pushup counter will also be used for sending in the info.
if (Detected == HIGH) { // Turn LED OFF if it was previous ON
Detected = LOW;
digitalWrite(ledPin, LOW);
digitalWrite(buzzerPin, HIGH);
delay(200);
digitalWrite(buzzerPin, LOW);
pushupCount += 1;
}
else {
Detected = HIGH; // Turn LED ON if it was previous OFF
digitalWrite(ledPin, HIGH);
}
The button is used for uploading the information to the local server and sending it to firebase. We'd also be clearing up pushupCount flag since we are sending that information to the server.
while ((IR_sensed < 2)) { //Break after 2 good triggers
PyroRead = pulseIn(sensorPin, HIGH); //Measure trigger point
Serial.println(PyroRead);  // stop the autonomous robot
if (PyroRead > IR_threshold) { //Make sure trigger is over 198msec)
IR_sensed++; //Mark as a good trigger
}
buttonState = digitalRead(buttonPin);
if (buttonState == HIGH) {
// turn LED on:
digitalWrite(greenledPin, HIGH);
String tmp;
tmp = String(pushupCount);
Serial.println("\nStarting connection to server...");
// if you get a connection, report back via serial:
if (client.connect(server, 3000)) {
Serial.println("connected to server");
// Make a HTTP request:
client.println("GET /?pushup=" + tmp + " HTTP/1.1");
client.println("Host: 192.168.1.12");
client.println("Connection: close");
client.println();
}
digitalWrite(greenledPin, LOW);
pushupCount = 0;
}
}
When all the sensors are attached it should look something like following.
Step 6: Demo
Now that we have everything done finished, we can proceed to demo.
Arduino with Breadboard case

