Reverse Engineering of HobbyKing ESC Programming Card © GPL3+
DESCRIPTION
This project works with this Programming Card - Link as you can see it can program a LOT of HK esc like as the famous F-20A and many more:
- Hobby King 120A ESC 4A UBEC
- Hobby King 80A ESC 4A SBEC
- Hobby King 60A ESC 4A UBEC
- Hobby King 40A ESC 4A UBEC
- Hobby King 30A ESC 3A UBEC
- Hobby King 20A ESC 3A UBEC
I'm an Arduino and AVR fan, as I knew these esc mount an ATMEGA8 as MCU (microcontroller) so with a little bit of reverse engineering I could figure it out how to program them!
A programming card is a very helpfull tool to have, expecially when you want to be sure that your esc are all with the same settings (you don't want a esc with the brake ON, do you?). The problem is that usually people realize that they need it when the drone almost ready to fly and no one like to wait weeks to have it!
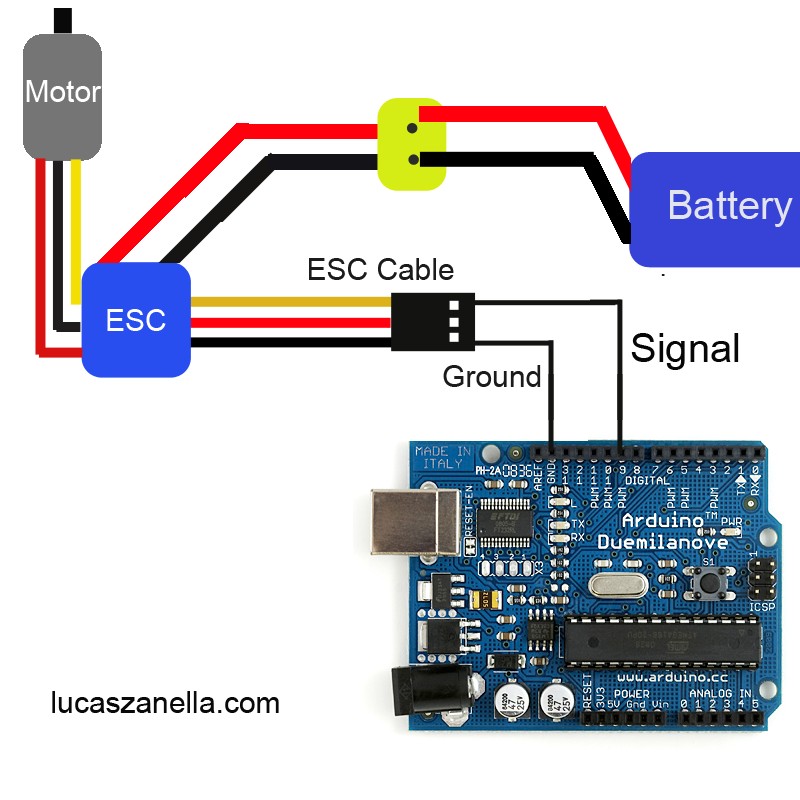
It will work with every Arduino board like as nano, micro , due, ecc. The connection are incredible easy and you don't need to solder anything. The code is easy, you just have to copy and paste in your Arduino IDE, choose the option that you like and it's all done!
You can also program all your ESC in one time connecting all the signal together.
If you like the world of drones, follow me, I am going to make a lot of projects for you, such as:
And don't be afraid to show your like/respect, it would be an exhortation for me to continue making stuff!

This project works with this Programming Card - Link as you can see it can program a LOT of HK esc like as the famous F-20A and many more:
- Hobby King 120A ESC 4A UBEC
- Hobby King 80A ESC 4A SBEC
- Hobby King 60A ESC 4A UBEC
- Hobby King 40A ESC 4A UBEC
- Hobby King 30A ESC 3A UBEC
- Hobby King 20A ESC 3A UBEC
I'm an Arduino and AVR fan, as I knew these esc mount an ATMEGA8 as MCU (microcontroller) so with a little bit of reverse engineering I could figure it out how to program them!
A programming card is a very helpfull tool to have, expecially when you want to be sure that your esc are all with the same settings (you don't want a esc with the brake ON, do you?). The problem is that usually people realize that they need it when the drone almost ready to fly and no one like to wait weeks to have it!
It will work with every Arduino board like as nano, micro , due, ecc. The connection are incredible easy and you don't need to solder anything. The code is easy, you just have to copy and paste in your Arduino IDE, choose the option that you like and it's all done!
You can also program all your ESC in one time connecting all the signal together.
If you like the world of drones, follow me, I am going to make a lot of projects for you, such as:
And don't be afraid to show your like/respect, it would be an exhortation for me to continue making stuff!

remember to select only a define per group