SHT85 with Arduino © MIT
DESCRIPTION
Temperature and humidity monitoring is a common thing in many projects.
normally we are using DHT11/22 for normal prototype building. But it has some limitations in the sense of some product building.
For DHT 11 :
- Ultra low cost
- 3 to 5V power and I/O
- 2.5mA max current use during conversion (while requesting data)
- Good for 20-80% humidity readings with 5% accuracy
- Good for 0-50°C temperature readings ±2°C accuracy
- No more than 1 Hz sampling rate (once every second)
- Body size 15.5mm x 12mm x 5.5mm
- 4 pins with 0.1" spacing
For DHT 22:
- Low cost
- 3 to 5V power and I/O
- 2.5mA max current use during conversion (while requesting data)
- Good for 0-100% humidity readings with 2-5% accuracy
- Good for -40 to 80°C temperature readings ±0.5°C accuracy
- No more than 0.5 Hz sampling rate (once every 2 seconds)
- Body size 15.1mm x 25mm x 7.7mm
- 4 pins with 0.1" spacing
But sometimes we need accuracy more than these sensors. at that time the good option is SHT85 sensor by Sensirion.
- Humidity Range: 0% to 100% Relative Humidity
- Humidity Accuracy: ± 1.5% RH
- Temperature Accuracy: ± 0.1°C
- RH Response Time: 8s
- Temperature Response Time: 2s
- Sensor Interface Type: I2C
- Sensor Case Style: SIP
- No. of Pins: 4Pins
- Operating Temperature Min: -40°C
- Operating Temperature Max: 105°C
- Supply Voltage : 2.15V - 5.5V
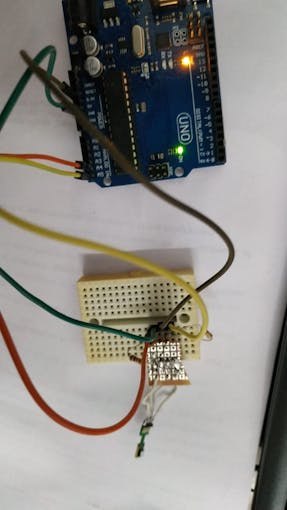
Here sensor interface using I2C. So follow below connection diagram.
For SDA and SCL pin config:
Board:I2C / TWI pins
Uno, Ethernet A4 (SDA), A5 (SCL)
Mega2560 20 (SDA), 21 (SCL)
Leonardo 2 (SDA), 3 (SCL)
Due 20 (SDA), 21 (SCL), SDA1, SCL1
Here I'm using Arduino Uno.
After connecting setup library and upload code.
To get SHT library Goto to this link Download as zip >> ADD library as a zip in Arduino IDE.
Then:
- Import the Wire library like this: From the menu bar, select Sketch > Import Library > Wire
- Import the arduino-sht library: From the menu bar, select Sketch > Import Library > arduino-sht
- Create an instance of the
SHTSensorclass (SHTSensor sht;) - In
setup(), make sure to init the Wire library withWire.begin() - If you want to use the serial console, remember to initialize the Serial library with
Serial.begin(9600) - Call
sht.readSample()in theloop()function, which reads a temperature and humidity sample from the sensor - Use
sht.getHumidity()andsht.getTemperature()to get the values from the last sample
Upload Example sketch to get Temperature and Humidity :
#include <Wire.h>
#include "SHTSensor.h"
SHTSensor sht;
// To use a specific sensor instead of probing the bus use this command:
// SHTSensor sht(SHTSensor::SHT3X);
void setup() {
// put your setup code here, to run once:
Wire.begin();
Serial.begin(9600);
delay(1000); // let serial console settle
if (sht.init()) {
Serial.print("init(): success\n");
} else {
Serial.print("init(): failed\n");
}
sht.setAccuracy(SHTSensor::SHT_ACCURACY_MEDIUM); // only supported by SHT3x
}
void loop() {
// put your main code here, to run repeatedly:
if (sht.readSample()) {
Serial.print("SHT:\n");
Serial.print(" RH: ");
Serial.print(sht.getHumidity(), 2);
Serial.print("\n");
Serial.print(" T: ");
Serial.print(sht.getTemperature(), 2);
Serial.print("\n");
} else {
Serial.print("Error in readSample()\n");
}
delay(1000);
}
Then view your result via Serial Monitor;
Credits : https://github.com/Sensirion/arduino-sht


_VJpgP332my.png?auto=compress%2Cformat&w=680&h=510&fit=max)
