Simplest Way for Voice Recognition Project Using c#toarduino © GPL3+
DESCRIPTION
We all are blessed with different types of Sensors Such as (Ear, tongue, Nose...) and we use them in our daily life not in one way but in two way communication there is transmission and receiving of data going on.
Same concept we are applying in machines !
As a beginner almost everyone starts with blinking leds on/off and I also did that but I wanted to control these electronic components using my own voice commands. So finally after I searched and learned from internet I completed the project and ready to share this project to creative community Specially (Beginners) !
Simplest way for voice recognition using arduino !
Just to make things simpler we are using LEDs.
In this project we will be turning on/off leds not in a standard way but using our own voice commands and exciting part is that it is very simple and easy just little bit of programming knowledge is required thats all !
Why I made this Project ?It all started when my teacher demonstrated a c# windows form application project to us. In that project Sir was Controlling virtual BULB using voice commands and it was made using c# visual studio software only no arduino or any other hardware stuff. It was amazing :)
So for new project using arduino I thought why not control Led using voice command because in this project we are physically controlling hardware not virtually which sir demonstrated.
Why this project is Simple ?There is one more important reason for this project and thats you makers I thought this project will help makers community to create something new out of it and voice recognition feature increases creativity, value of project !
Now the amazing part why it is so simple ?
Because you don't need any external module to make this project :) I was sure that there must be a way I can make this project without using voice recognition module ! and finally founded that way
Thanks to below link
https://www.c-sharpcorner.com/article/turning-led-off-and-on-through-voice-recognition/
How to Make it ?Gather all the components required for this project.
- Design circuit on breadboard as below circuit diagram
- Then plug in arduino usb cable to your computer
- download arduino code open arduino IDE and create new sketch paste the code.
There is just one software you would need to install and that is visual studio I am using microsoft visual studio version 2010 and you can install any version you want just make sure you can create windows form application using c# from it.
watch to download visual studio
Click below link and then click download->direct download
https://www.dropbox.com/sh/pmdflsjui0ayjcs/AAAO4sfb2Tc559CLyOQut_NDa?dl=0

and you are done
- upload your arduino sketch and run the c# application by clicking green arrow start button

Note#0: This Project will wont work if you have not included using.system.speech library in your visual studio c# code don't worry just follow below instruction to include library
Go to above tool bar Project->Add Reference->.Net ->Search using.system.speech and click OK thats all :)

Note#1 : Make Sure Your COM Port you selected in your arduino IDE is Same as in visual studio c# code.
As You can see below mine COM Port is COM5 Same in arduino and C# code.

If You are having any confusion just watch this demonstration video and you are ready to control leds using your own voice :)
What you made from this project ?Use your creativity to make something new out of this project.
Learn, Create, Share and Repeat

 |
| × | 1 | |||
 |
| × | 3 | |||
 |
| × | 3 | |||
 |
| × | 1 | |||
 |
| × | 1 | |||
| × | 1 |
 |
| |||
 |
|
We all are blessed with different types of Sensors Such as (Ear, tongue, Nose...) and we use them in our daily life not in one way but in two way communication there is transmission and receiving of data going on.
Same concept we are applying in machines !
As a beginner almost everyone starts with blinking leds on/off and I also did that but I wanted to control these electronic components using my own voice commands. So finally after I searched and learned from internet I completed the project and ready to share this project to creative community Specially (Beginners) !
Simplest way for voice recognition using arduino !
Just to make things simpler we are using LEDs.
In this project we will be turning on/off leds not in a standard way but using our own voice commands and exciting part is that it is very simple and easy just little bit of programming knowledge is required thats all !
Why I made this Project ?It all started when my teacher demonstrated a c# windows form application project to us. In that project Sir was Controlling virtual BULB using voice commands and it was made using c# visual studio software only no arduino or any other hardware stuff. It was amazing :)
So for new project using arduino I thought why not control Led using voice command because in this project we are physically controlling hardware not virtually which sir demonstrated.
Why this project is Simple ?There is one more important reason for this project and thats you makers I thought this project will help makers community to create something new out of it and voice recognition feature increases creativity, value of project !
Now the amazing part why it is so simple ?
Because you don't need any external module to make this project :) I was sure that there must be a way I can make this project without using voice recognition module ! and finally founded that way
Thanks to below link
https://www.c-sharpcorner.com/article/turning-led-off-and-on-through-voice-recognition/
How to Make it ?Gather all the components required for this project.
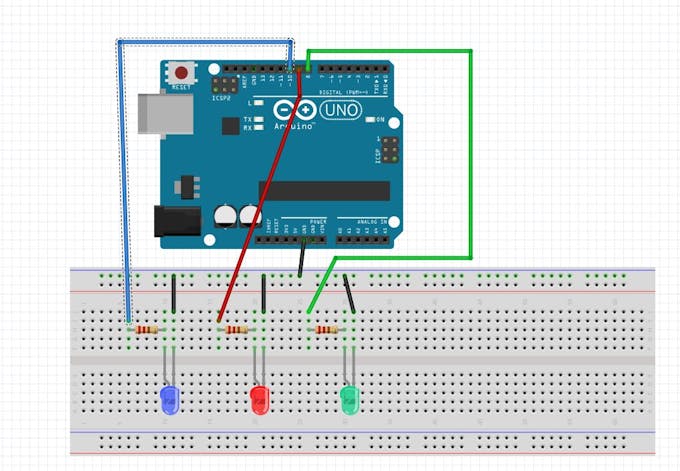
- Design circuit on breadboard as below circuit diagram
- Then plug in arduino usb cable to your computer
- download arduino code open arduino IDE and create new sketch paste the code.
There is just one software you would need to install and that is visual studio I am using microsoft visual studio version 2010 and you can install any version you want just make sure you can create windows form application using c# from it.
watch to download visual studio
Click below link and then click download->direct download
https://www.dropbox.com/sh/pmdflsjui0ayjcs/AAAO4sfb2Tc559CLyOQut_NDa?dl=0
and you are done
- upload your arduino sketch and run the c# application by clicking green arrow start button
Note#0: This Project will wont work if you have not included using.system.speech library in your visual studio c# code don't worry just follow below instruction to include library
Go to above tool bar Project->Add Reference->.Net ->Search using.system.speech and click OK thats all :)
Note#1 : Make Sure Your COM Port you selected in your arduino IDE is Same as in visual studio c# code.
As You can see below mine COM Port is COM5 Same in arduino and C# code.
If You are having any confusion just watch this demonstration video and you are ready to control leds using your own voice :)
What you made from this project ?Use your creativity to make something new out of this project.
Learn, Create, Share and Repeat
1 -> First of all connect leds and resistors as shown in diagram
2-> Then start one by one and connect led +ive terminal on same column where resistor is connected to arduino digital pin box
GreenLed +ive terminal to digital Pin 8
RedLed +ive terminal to digital Pin 9
BlueLed +ive terminal to digital Pin 10
3-> At last connect Ground from arduino to leds -ive terminal using jumper wire as shown in diagram