Smart Humidifier © CC BY-NC
DESCRIPTION

Introduction:
There are three key components to healthy air. It must be fresh, clean, and have the proper humidity. Humans are sensitive to humidity because the human body uses evaporative cooling, enabled by perspiration, as the primary mechanism to rid itself of waste heat. Humans can be comfortable within a wide range of humidity depending on the temperature—from thirty to seventy percent but ideally between 50% and 60%. Very low humidity can create discomfort, respiratory problems, and aggravate allergies in some individuals. In the winter, it is advisable to maintain relative humidity at 30 percent or above. Extremely low (below 20%) relative humidity may also cause eye irritation. Humidify your home, especially the bedrooms. Low humidity is a common cause of nosebleeds. The right humidity levels help your home to feel cool in the summer and warm in the winter.In the winter, or in regions that tend to be cold for most of the year, humidification, or adding moisture, is essential.
This project senses temperature & humidity from your room or environment and check either it is in comfortable range or not. If it finds that relative humidity is lower than the required limit, it turns on the humidifier for 10 seconds, then again checks the humidity level. If not adequate then again turns on. Seeed studio HSM-20G temperature & humidity sensor is used here to sense the temperature and humidity. A LCD display is used to show the temperature and humidity level on your room. You can use Grove button to manually control the humidifier. To control all the things Arduino UNO is used.
How it works:
Grove - Water Atomization is fine Grove module for you to develop an atomizer or an atomizer module in your applications easily. It Heated with ultrasound. If you give logic high to the enable pin it starts working. It works with 5V and takes maximum 2W. Details
HSM-20G temperature & humidity module: HSM-20G is a low price temperature/humidity module and gives analog reading. It converts relative humidity and temperature to corresponding standard voltage. Datasheet of HSM-20G
Connection:
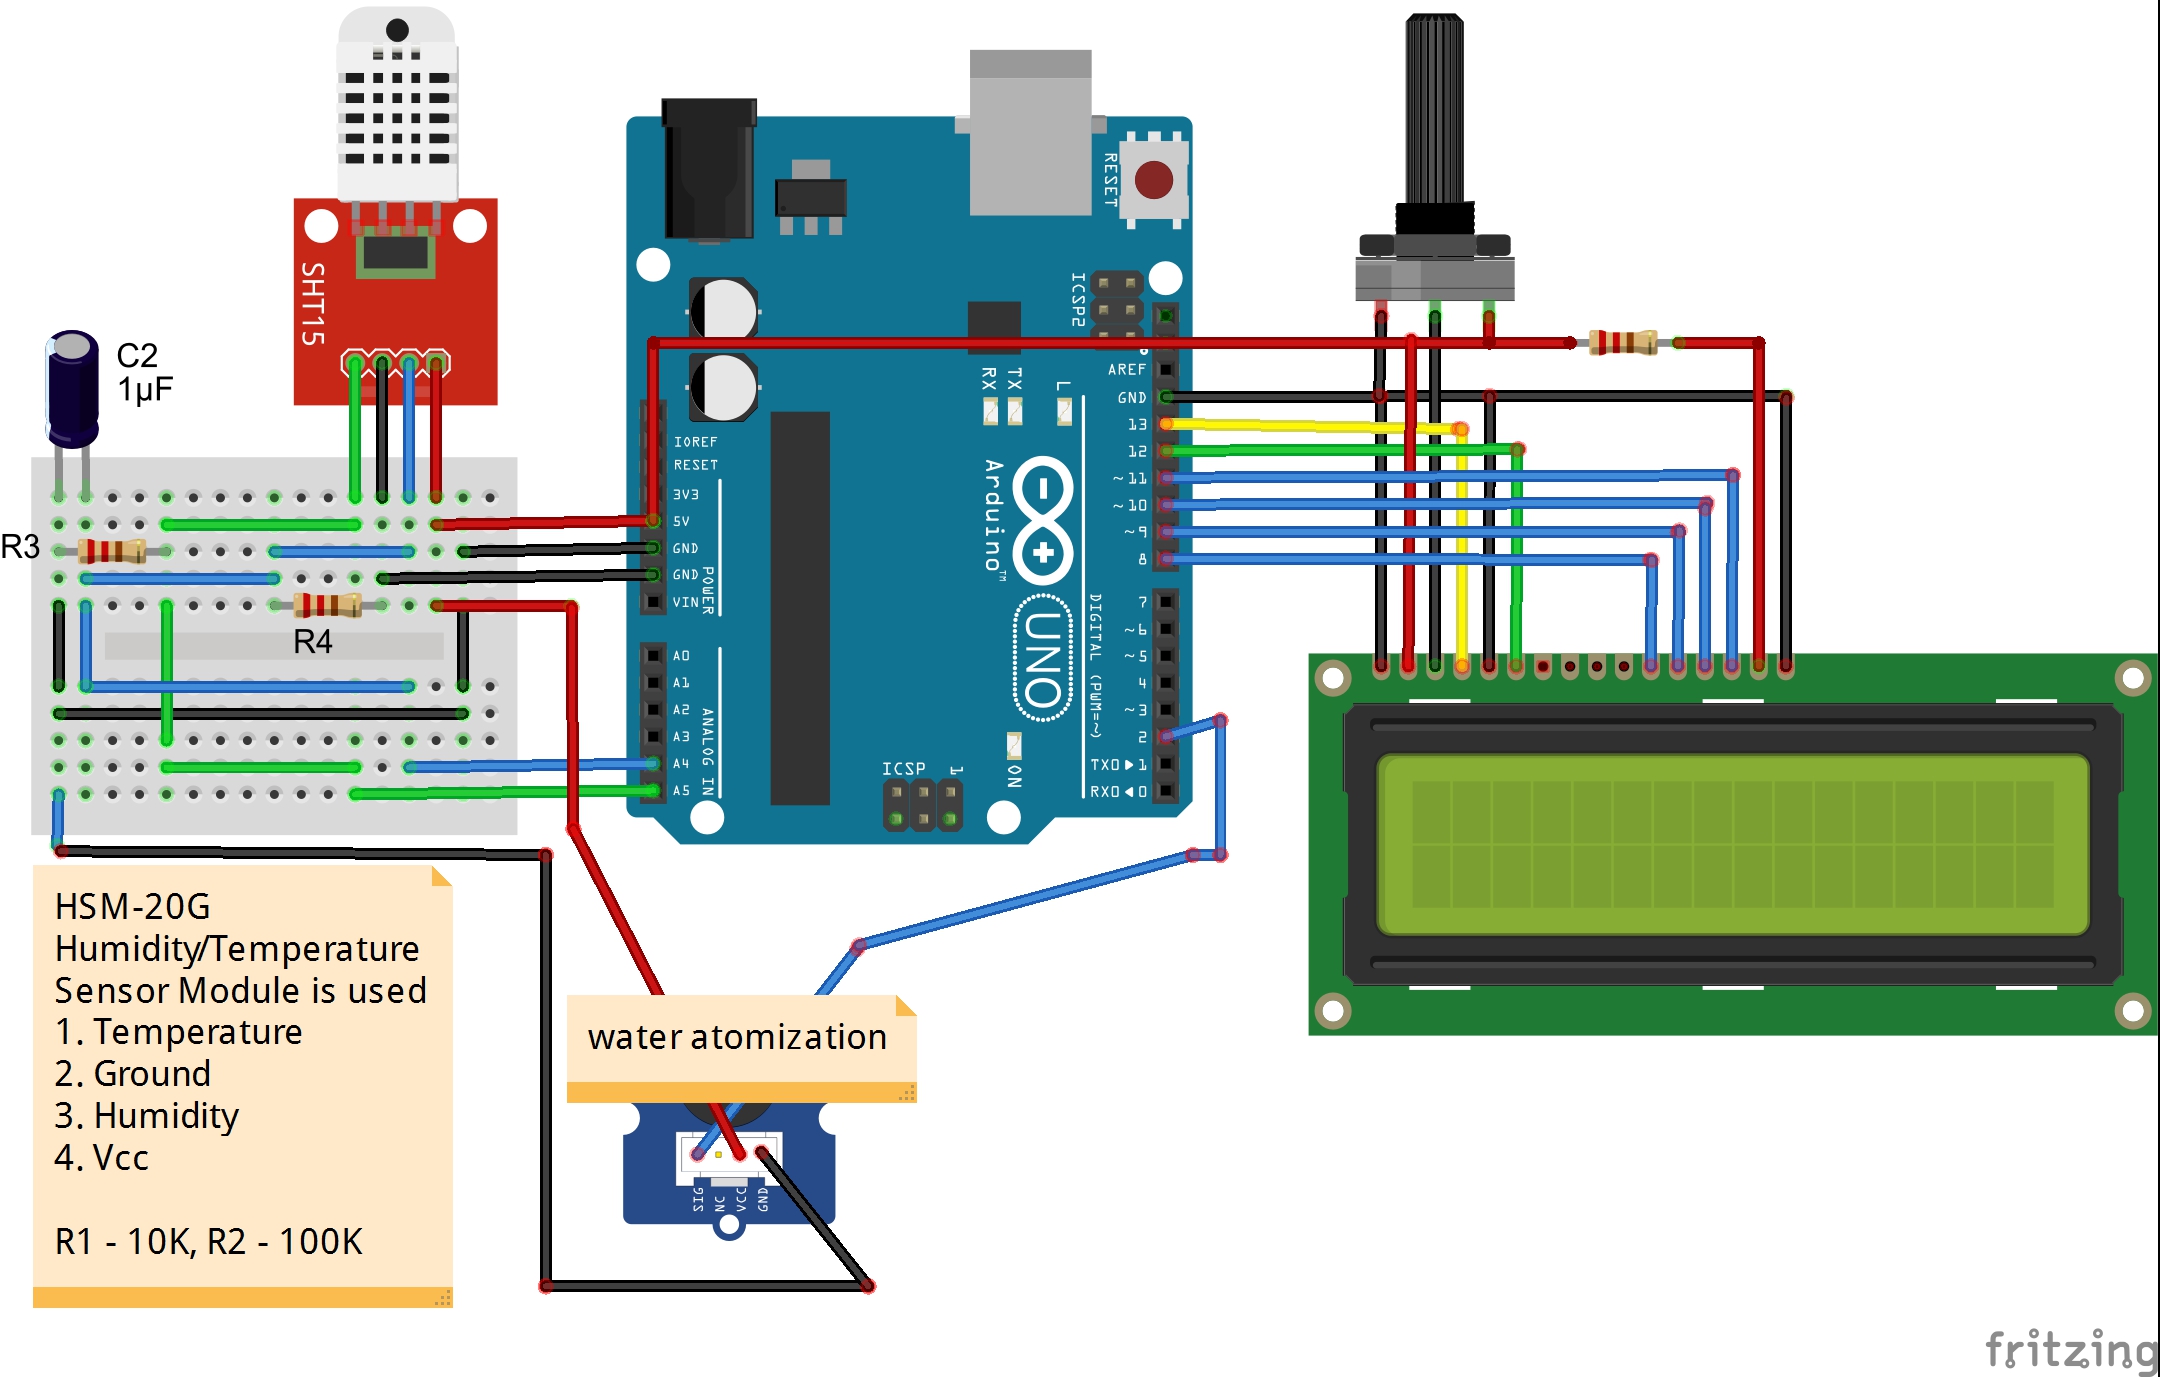
Follow the schematic diagram carefully. A 10K resistor is connected to T and Ground pin according to datasheet. Another 100K and 10uF capacitor is connected to H and Ground pin. I used open source fritzing to draw the schematic. I did not find Water Atomization to fritzing parts library and for that I used Grove buzzer module and made a note as water automization. Don't panic, connection is same and just consider the signal pin as enable pin of water atomization. I attached two image here, one without LCD connection and another with LCD connection.
Fritzing source file is attached to source code of my github repository. You can download it.

Collect all the component mentioned below. Connect HSM-20G temperature and humidity sensor to the arduino board with the resistors and capacitor shown in the schematic. You can use breadboard to easily connect sensor to the resistors and capacitor and the arduino board.

Make & Test:
Upload the program to the arduino board and open the serial monitor. If it works correctly you should get the following result from the serial monitor.

Now connect the LCD display to the arduino board and test it. LCD should display the relative humidity and temperature. If everything works well now it is the time to connect water atomization to the system. To do that first connect the driver board to the arduino board, then connect ultrasonic transducer to the driver board.

Take a cup filled with water and put some tissue into the water. Put ultrasonic transducer onto tissue. Note that the bottom side is the side with hollow which is supposed to face downside. Let bottom of transducer plate sink into the water and keep top side above water. The function of tissue is lead water to the transducer and keep upper side of transducer above water.

Power up the system, If you see vapor produced then congratulation! You made it, experiment with it!!!
Notes that do not touch transducer interface pins directly because peak output voltage of Drier board can be 65V.

Introduction:
There are three key components to healthy air. It must be fresh, clean, and have the proper humidity. Humans are sensitive to humidity because the human body uses evaporative cooling, enabled by perspiration, as the primary mechanism to rid itself of waste heat. Humans can be comfortable within a wide range of humidity depending on the temperature—from thirty to seventy percent but ideally between 50% and 60%. Very low humidity can create discomfort, respiratory problems, and aggravate allergies in some individuals. In the winter, it is advisable to maintain relative humidity at 30 percent or above. Extremely low (below 20%) relative humidity may also cause eye irritation. Humidify your home, especially the bedrooms. Low humidity is a common cause of nosebleeds. The right humidity levels help your home to feel cool in the summer and warm in the winter.In the winter, or in regions that tend to be cold for most of the year, humidification, or adding moisture, is essential.
This project senses temperature & humidity from your room or environment and check either it is in comfortable range or not. If it finds that relative humidity is lower than the required limit, it turns on the humidifier for 10 seconds, then again checks the humidity level. If not adequate then again turns on. Seeed studio HSM-20G temperature & humidity sensor is used here to sense the temperature and humidity. A LCD display is used to show the temperature and humidity level on your room. You can use Grove button to manually control the humidifier. To control all the things Arduino UNO is used.
How it works:
Grove - Water Atomization is fine Grove module for you to develop an atomizer or an atomizer module in your applications easily. It Heated with ultrasound. If you give logic high to the enable pin it starts working. It works with 5V and takes maximum 2W. Details
HSM-20G temperature & humidity module: HSM-20G is a low price temperature/humidity module and gives analog reading. It converts relative humidity and temperature to corresponding standard voltage. Datasheet of HSM-20G
Connection:
Follow the schematic diagram carefully. A 10K resistor is connected to T and Ground pin according to datasheet. Another 100K and 10uF capacitor is connected to H and Ground pin. I used open source fritzing to draw the schematic. I did not find Water Atomization to fritzing parts library and for that I used Grove buzzer module and made a note as water automization. Don't panic, connection is same and just consider the signal pin as enable pin of water atomization. I attached two image here, one without LCD connection and another with LCD connection.
Fritzing source file is attached to source code of my github repository. You can download it.
Collect all the component mentioned below. Connect HSM-20G temperature and humidity sensor to the arduino board with the resistors and capacitor shown in the schematic. You can use breadboard to easily connect sensor to the resistors and capacitor and the arduino board.
Make & Test:
Upload the program to the arduino board and open the serial monitor. If it works correctly you should get the following result from the serial monitor.
Now connect the LCD display to the arduino board and test it. LCD should display the relative humidity and temperature. If everything works well now it is the time to connect water atomization to the system. To do that first connect the driver board to the arduino board, then connect ultrasonic transducer to the driver board.
Take a cup filled with water and put some tissue into the water. Put ultrasonic transducer onto tissue. Note that the bottom side is the side with hollow which is supposed to face downside. Let bottom of transducer plate sink into the water and keep top side above water. The function of tissue is lead water to the transducer and keep upper side of transducer above water.
Power up the system, If you see vapor produced then congratulation! You made it, experiment with it!!!
Notes that do not touch transducer interface pins directly because peak output voltage of Drier board can be 65V.
Github