TM1637 Digit Display - Arduino Quick Tutorial © GPL3+
DESCRIPTION
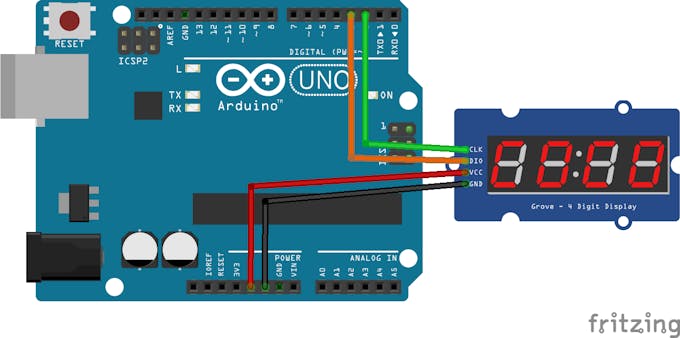
The TM-1637 (also called the Grove 4-Digit Display by Seeed Studio) is a 7-segment 4-digit display that can be easily controlled with a few wires on an Arduino.
Instructions1.) Build the circuit according to the circuit diagram.
2.) Install the TM1637 library in the Arduino IDE by going to Sketch>Include Library>Manage Libraries. Then, type in "TM1637" and install the library labeled "Grove 4-Digit Display" by Seeed Studio.


3.) Type in the setup code (This can be found in the "Code" section of this page):

CLK and DIO can be set to any pin on the Arduino, they do not have to be pins 2 and 3.
To set the brightness, pass in a value between 0-7 into tm.set();
4.) Now you can display characters in the loop function.
tm.display(<position>, <character> ); will display a character on the display.
Position refers to the digit you want to change. The first is 0 and the last is 3.

Character refers to the character you want to display. 0-9 displays 0-9 and 10-15 displays A-F

Here is an example that displays "12:Ab":

5.) Connect your Arduino to the computer and upload the sketch.
Video Tutorial |
| × | 1 | |||
| × | 1 | ||||
 |
| × | 1 |

The TM-1637 (also called the Grove 4-Digit Display by Seeed Studio) is a 7-segment 4-digit display that can be easily controlled with a few wires on an Arduino.
Instructions1.) Build the circuit according to the circuit diagram.
2.) Install the TM1637 library in the Arduino IDE by going to Sketch>Include Library>Manage Libraries. Then, type in "TM1637" and install the library labeled "Grove 4-Digit Display" by Seeed Studio.
3.) Type in the setup code (This can be found in the "Code" section of this page):
CLK and DIO can be set to any pin on the Arduino, they do not have to be pins 2 and 3.
To set the brightness, pass in a value between 0-7 into tm.set();
4.) Now you can display characters in the loop function.
tm.display(<position>, <character> ); will display a character on the display.
Position refers to the digit you want to change. The first is 0 and the last is 3.
Character refers to the character you want to display. 0-9 displays 0-9 and 10-15 displays A-F
Here is an example that displays "12:Ab":
5.) Connect your Arduino to the computer and upload the sketch.
Video Tutorial